 Tutorial")

Laravel Vue JS CRUD SPA (Single-Page Application) Tutorial
Last updated on January 4th, 2022
Here in our Laravel Vue JS CRUD tutorial, we'll share with you how we've created a single-page application (SPA) where we can perform CRUD (create, read, update, delete) operations in MySQL database interactively.
Laravel Vue JS CRUD SPA (Single-page application) demo
Summary
Before Building Our CRUD SPA in Laravel and Vue
Web Technologies We Use for this Demo
5 Steps to Build Our CRUD SPA Using Laravel, Vue, and Necessary Packages
- Step 1: Initial Steps to Build Our CRUD SPA
- Step 2: Install AdminLTE 3 and Font Awesome 5
- Step 3: Setup Backend - RESTful API for CRUD Operations
- Step 4: Install and Setup Necessary Packages: Vue Router, Vue Axios, and Others
- Step 5: Setup Frontend - Vue Component for User Management Module
Before We Build Our CRUD SPA Using Laravel & Vue JS
For demo purposes, we'll try to create a sample module User Management. Within this module we'll:
- Create a data-table with pagination to list out user records organized.
- Add an add new user button. When clicked, a modal pop-up containing add new user form will be shown. Filling up the form and hitting the save changes button will store user details in MySQL database. We'll use a single form for adding and editing user records. Form title will be dynamically rendered.
- Add icons for edit and delete actions. When the edit icon clicked, a modal pop-up containing the same form will be shown. Each input field within the form will be populated with specific user details. Changing the value of each field and hitting the update button will update user details in the database. When the delete icon clicked, a modal pop-up containing deletion confirmation will be shown. Hitting the cancel button will cancel the operation and hide the modal pop up. Hitting yes, delete it! button will delete user records in the database.
We'll leverage Laravel's API resource to create our backend RESTful APIs.
Vue JS will handle the dynamic rendering of our pages (components) necessary for CRUD operations.
We'll use the SPA approach so the page won't need to reload when viewing (paginating), adding, editing, and deleting user records. One of the main advantages of SPA is we make smaller requests to fetch only the data that changes. SPA is also faster when it comes to page changes.
Web Technologies We Use Here in Our Laravel Vue JS CRUD SPA Demo
Just a list of web technologies we've used to make our CRUD SPA working. We'll explain each in detail later.
- Laravel 6.18.0 - (run php artisan -V command to check)
- Vue JS 4.1.2 - (run vue -V command to check)
- AdminLTE 3
- Bootstrap 4
- Fontawesome 5
- Vue router
- Axios
- Vform
- Laravel Vue pagination
- Sweet alert 2
In this tutorial, we didn't include steps to secure our APIs. To secure your API, you can use either Laravel passport or JWT.
We're also suggesting you add Vue Devtools (Vue.js devtools) in your browser to debug your Vue app easily.
Building Our CRUD SPA In 5 Steps Using Laravel, Vue JS, & Necessary Packages
Step 1: Initial Steps to Build Our CRUD SPA
Install Laravel.
Run composer create-project laravel/laravel 6.1 --prefer-dist command to install a fresh Laravel project.
Serve your Laravel application. If you're using PHP's built-in development server to serve your app, run php artisan serve command.
CLI should return a message: Laravel development server started: http://your-host:your-port
Open a browser and access your newly created Laravel app. You should see Laravel's default welcome page.
Setup Database.
Create your database. We'll name our database laravel_vue_js_crud_spa.
Update your database details from .env file.
Once you update your .env, you have to restart serving your Laravel app before settings will take effect. From CLI, press Ctrl + C to stop serving your app. Then start serving it again by running php artisan serve command.
Install Laravel's Built-In Authentication.
Install Laravel UI composer package. Open new CLI and run the following command.
For Laravel 7 and above: composer require laravel/ui --dev.
For Laravel 6 and below (We'll run this command since we're using 6.1 version of Laravel): composer require laravel/ui "^1.0" --dev -vvv.
To generate views required for authentication, run php artisan ui vue --auth command.
CLI should display a message: Vue scaffolding installed successfully. Authentication scaffolding generated successfully.
Views will be stored inside /resources/views/auth folder.
Migrate Laravel's built-in authentication tables. Run php artisan migrate:fresh command to migrate all tables.
If somehow CLI returns an error message: Illuminate\Database\QueryException : SQLSTATE[42000]: Syntax error or access violation: 1071 Specified key was too long; max key length is 1000 bytes (SQL: alter table `users` add unique `users_email_unique`(`email`)).
Edit /app/Providers/AppServiceProvider.php.
Before class declaration, add use Illuminate\Support\Facades\Schema;
Inside function boot, add Schema::defaultStringLength(191);
Migrate database tables again. Run php artisan migrate:fresh command.
Go back to your browser and reload your page. You should see Login and Register link at the top right corner of your page. You now have Login and Register working within your Laravel app.
Step 2: Install AdminLTE 3 & Font Awesome 5
Install AdminLTE 3.
AdminLTE is a responsive web app template we use to create admin dashboards and control panels interface. We don't want to start from scratch to make our web app responsive so we'll use this HTML template. AdminLTE 3 (latest version) is based on Bootstrap 4 (which is already installed in Laravel v5.5 and above).
Run npm install admin-lte@v3.0.0-alpha.2 --save command to install latest version of AdminLTE.
Install Font Awesome 5.
Font Awesome is a font and icon toolkit (collection of icons, CSS, settings, and traditional typographic fonts) based on CSS and LESS. We'll use it to display icons within our web app.
Run npm install @fortawesome/fontawesome-free --save command to install Font awesome.
* @fortawesome above is not a typo.
Now we have to load AdminLTE and Font awesome within our app.
Edit /resources/js/bootstrap.js. After require('bootstrap'); add require('admin-lte');. Refer to the following code (line 14-15).
window._ = require('lodash');

/**
 * We'll load jQuery and the Bootstrap jQuery plugin which provides support
 * for JavaScript based Bootstrap features such as modals and tabs. This
 * code may be modified to fit the specific needs of your application.
 */

try {
    window.Popper = require('popper.js').default;
    window.$ = window.jQuery = require('jquery');

    require('bootstrap');
    require('admin-lte');
} catch (e) {}
Edit /resources/sass/app.scss, replace everything with the following code.
// Fonts
@import url('https://fonts.googleapis.com/css?family=Nunito');

// Variables
@import 'variables';
$fa-font-path: '../webfonts';

// Bootstrap
@import '~bootstrap/scss/bootstrap';

// AdminLTE
@import '~admin-lte/dist/css/adminlte.css';

// Fontawesome
@import '~@fortawesome/fontawesome-free/scss/fontawesome.scss';
@import '~@fortawesome/fontawesome-free/scss/solid.scss';
@import '~@fortawesome/fontawesome-free/scss/brands.scss';

// Add your custom sass code below...
We need to run scripts from package.json so our app will be aware of changes we've made to our Vue components.
Open new CLI, navigate to your project folder and run npm run watch command to compile all Vue components and watch the files for changes. Npm run watch will recompile all components automatically every time we update them.

run npm run watch command to recompile all components
Now we have 2 instances of CLI running different command.
CLI 1 to serve our app using php artisan serve command.
CLI 2 to watch our files for changes using npm run watch command.
Let's use AdminLTE template now. Create new file inside /resources/views/layouts (e.g. laravel-vue-js-crud-spa.blade.php).
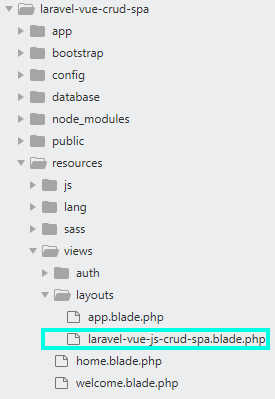
create new layout laravel-vue-crud-spa-blade.php
Copy and paste AdminLTE's HTML structure here to laravel-vue-js-crud-spa-blade.php.
Next, paste the following code inside the head tag.
<!--
We have to include public/css/app.css
Add the following code inside head tag
-->
<link rel="stylesheet" type="text/css" href="/css/app.css">
Then, paste the following before end of body tag.
<!--
We have to include public/js/app.js
Add the following code before end of body tag
-->
@if( app()->environment('local') )
  <script src="{{ mix('js/app.js') }}"></script>
@else
  <script src="{{ url('/js/app.js') }}"></script>
@endif
Here's how you do those steps.
copy and paste adminlte's html structure to /resources/layouts/laravel-vue-js-crud-spa-blade.php
Edit /resources/views/home.blade.php, replace @extends('layouts.app'); with @extends('layouts.laravel-vue-js-crud-spa').
Here you should have AdminLTE and Font awesome added within your Laravel app.
Next, we'll create our APIs for CRUD operations, then we'll setup API routes.
Step 3: Setup Backend - RESTful API for CRUD Operations
Run php artisan make:controller API/UserController --resource command to create new resource controller.
We've prepended API/ before the name of our controller (UserController) to separate API controllers from non-API controllers. The command above will create API folder first then store UserController.php inside it.
We've also appended --resource in our command so our controller will be able to handle all HTTP requests (GET, POST, PUT/PATCH, DELETE).
Edit UserController.php and add/update these functions: index, store, update and destroy. Refer to the following code.
<?php

namespace App\Http\Controllers\API;

use App\Http\Controllers\Controller;
use Illuminate\Http\Request;
use App\User;
use Illuminate\Support\Facades\Hash;

class UserController extends Controller
{
    /**
     * Display a listing of the resource.
     *
     * @return \Illuminate\Http\Response
     */
    public function index()
    {
        $data = User::orderBy('id', 'desc')->paginate(5);
        return response()->json($data);
    }

    /**
     * Show the form for creating a new resource.
     *
     * @return \Illuminate\Http\Response
     */
    public function create()
    {
        //
    }

    /**
     * Store a newly created resource in storage.
     *
     * @param  \Illuminate\Http\Request  $request
     * @return \Illuminate\Http\Response
     */
    public function store(Request $request)
    {
        // use /validate method provided by Illuminate\Http\Request object to validate post data
        // if validation fails JSON response will be sent for AJAX requests
        $this->validate($request, [
                'name' => 'required|string|max:191',
                'email' => 'required|string|email|unique:users|max:191',
                'password' => 'required|string|min:6',
            ]
        );

        return User::create([
            'name' => $request['name'],
            'email' => $request['email'],
            'password' => Hash::make($request['password']),
        ]);
    }

    /**
     * Display the specified resource.
     *
     * @param  int  $id
     * @return \Illuminate\Http\Response
     */
    public function show($id)
    {
        //
    }

    /**
     * Show the form for editing the specified resource.
     *
     * @param  int  $id
     * @return \Illuminate\Http\Response
     */
    public function edit($id)
    {
        //
    }

    /**
     * Update the specified resource in storage.
     *
     * @param  \Illuminate\Http\Request  $request
     * @param  int  $id
     * @return \Illuminate\Http\Response
     */
    public function update(Request $request, $id)
    {
        $user = User::findOrFail($id);

        $this->validate($request, [
                'name' => 'required|string|max:191',
                'email' => 'required|string|email|max:191|unique:users,email,' . $user->id,
                'password' => 'sometimes|min:6',
            ]
        );

        $user->update($request->all());

        return $user;
    }

    /**
     * Remove the specified resource from storage.
     *
     * @param  int  $id
     * @return \Illuminate\Http\Response
     */
    public function destroy($id)
    {
        $user = User::findOrFail($id);

        $user->delete();

        return $user;
    }
}
Next, declare resourceful route. Edit /routes/api.php and add the following code.
Route::apiResources(['users' => 'API\UserController']);
Resourceful route users we've declared above will create multiple routes necessary for our CRUD operations.
For you to see all available actions our resource route can handle, open new CLI and run php artisan route:list command.
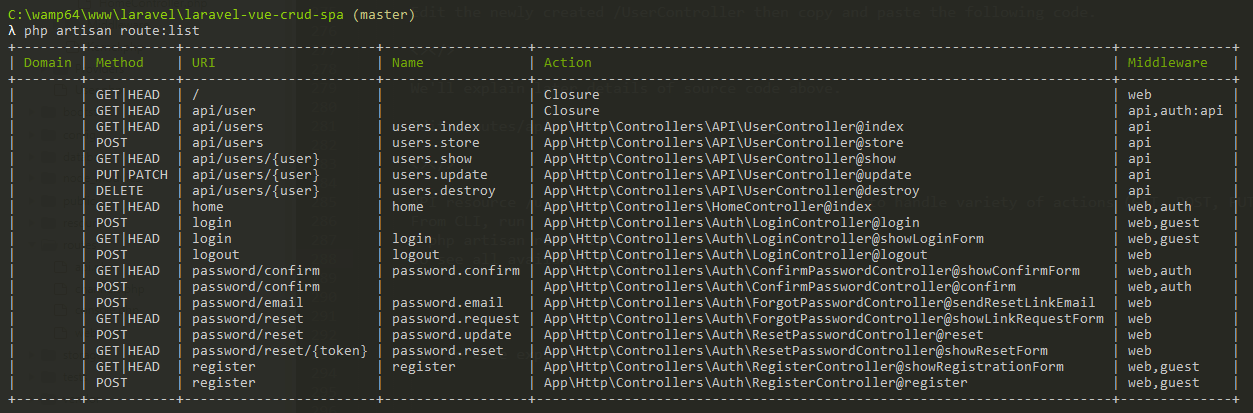
run php artisan route:list command to show list of routes available
Let's conduct a test using Postman app to check if our APIs working. Postman is a famous platform we can use to test APIs.
Launch Postman app.
Let's try first API for getting users and see if it's working.
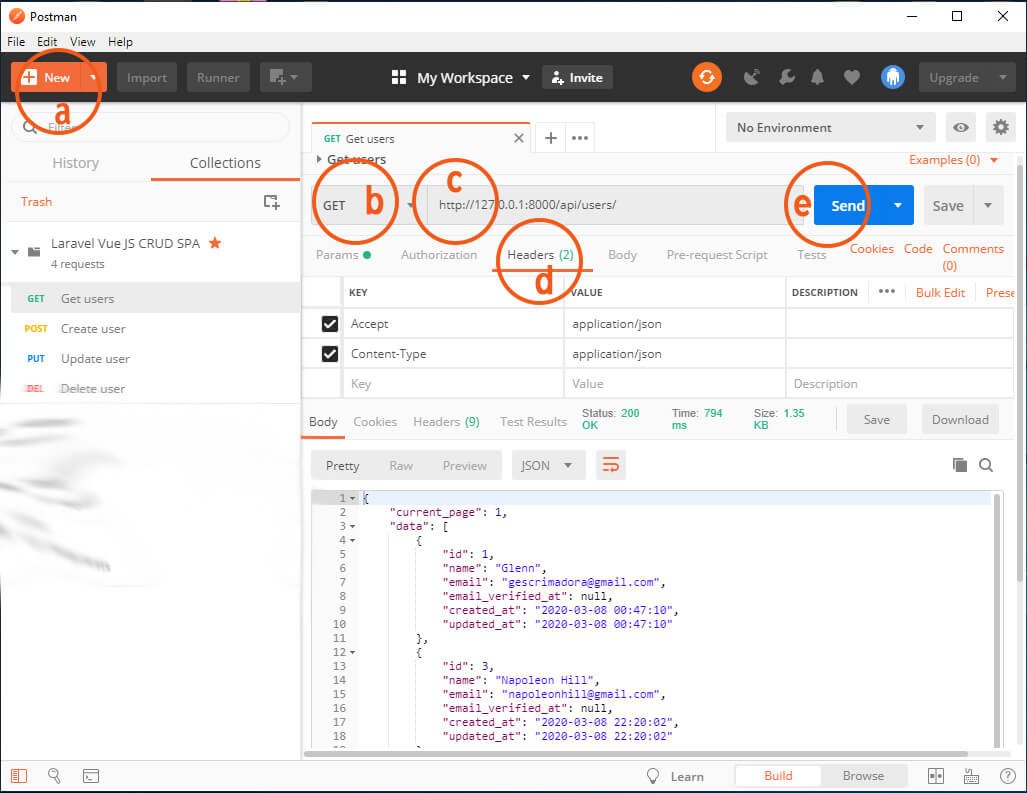
testing get users API using Postman
a. Create new request.
b. Method should be GET.
c. Provide request URL (e.g. http://your-host:your-port/api/users).
d. Navigate to Headers tab and add 2 keys -- Accept and Content-Type, both values are application/json.
e. Now hit send button.
Upon clicking send button from Postman app, it'll send GET request to API route /api/users. API route /api/users will then trigger UserController's index function. The function will then return JSON response containing users.
Don't forget to save your current settings (press Ctrl + S).
Next, let's try API for creating users.

testing create user API using Postman
a. Create new request again.
b. Set method as POST since we're creating new record and will insert it into our database.
c. Provide request URL (e.g. http://your-host:your-port/api/users).
d. Headers tab settings should be the same as API for getting users.
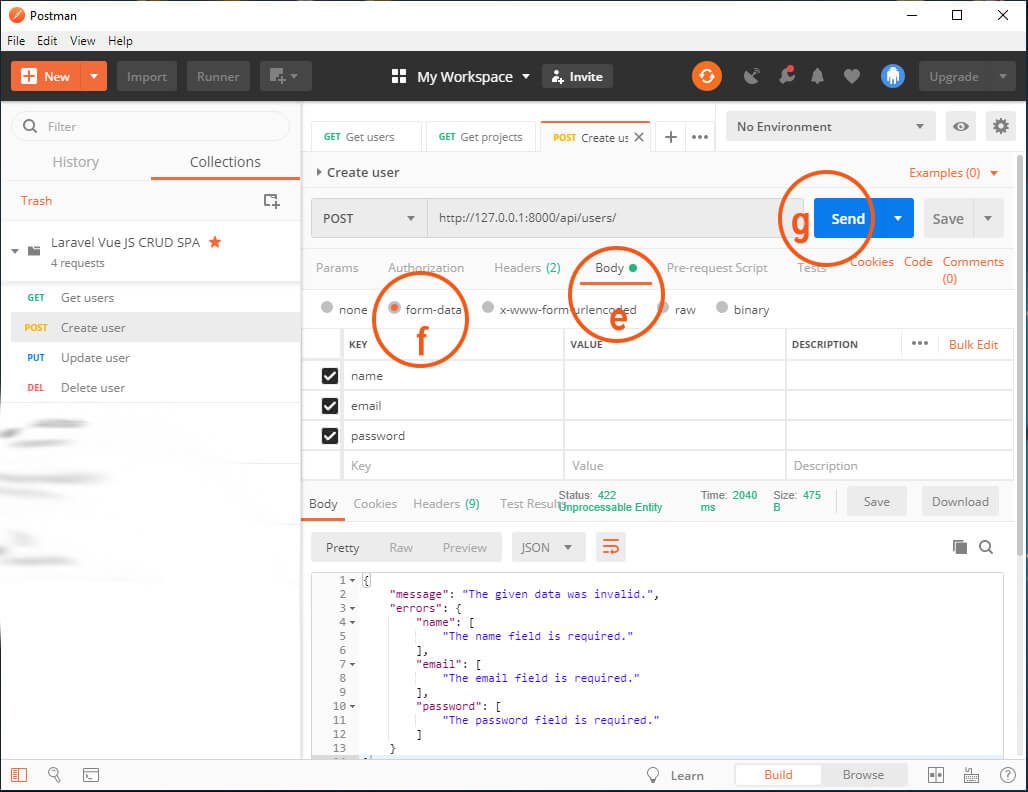
configure Body settings key value before testing create user API
e. Provide request body (payload). Navigate to Body tab.
f. Select form to easily add keys and values of data. Add the following keys: name, email, password. Provide value for each key.
g. Hit send button.
If validation fails, user details won't be stored in our database and the response body will return JSON response containing message and error details.
If validation successes, the response body will return JSON response containing user details that have been inserted successfully.

Check users table to verify that user details have been inserted into our database.

verifying that create user API successfully inserted user details in database
Now, let's try API for updating users.

testing update user API using Postman
Duplicate API for creating user so we don't have to configure Headers tab again, then do the following:
a. Set method as PUT or PATCH.
b. From the request URL, append user id of user you want to update.
c. Provide request body (payload) (user data to patch). Navigate to Body tab.
d. Select raw to add keys and values of data you want to update.
e. Hit send button.
The response body should return JSON response containing user details we've updated.
At last, let's try API for deleting users.
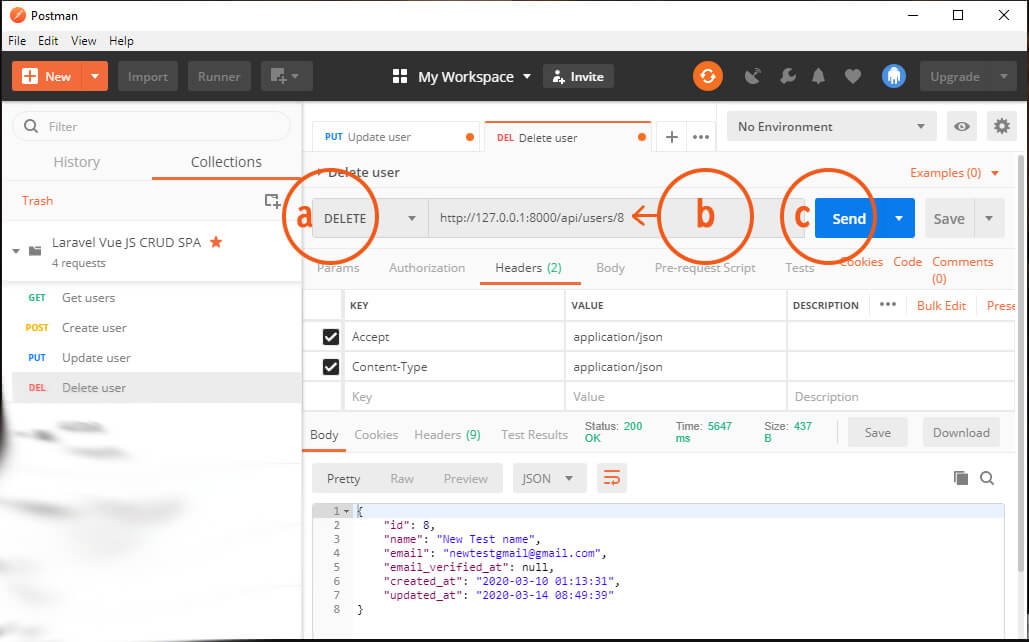
testing delete user API using Postman
Duplicate API for creating user again, then follow steps below:
a. Set method as DELETE.
b. From the request URL, append user id of user you want to delete.
e. Hit send button right away.
API should return a JSON response containing user details we've deleted.
We now have our APIs for CRUD operations working and ready.
Later we'll use them after we're done creating Vue components necessary for our Laravel Vue JS CRUD SPA.
Step 4: Install & Setup Necessary Packages - Vue Router, Vue Axios, VForm, Laravel Vue Pagination, Sweet Alert 2
Install Vue router.
Vue router is the official router for Vue JS. We'll use this package to easily implement SPA approach in our app. Vue router core components are router-view and router-link. Later we'll show you how we're going to use them within our master layout.
Run npm install vue-router --save command to install Vue router.
Inside /resources/js create new file router.js.
Edit router.js and paste the following code.
import Vue from "vue";
import VueRouter from "vue-router"; // We import /Vue router from /vue-router first.

Vue.use(VueRouter)

import UserManagement from "./components/usermanagement";

const router = new VueRouter({ // Then we register route for User management module.
  routes: [
    {
      path:"/usermanagement",
      name: "usermanagement",
      component: UserManagement
    },
  ],
});

export default router // Next we create local registration of /router property, so we can import it within /app.js (our root /Vue instance).
Save router.js.
Source code explanation
Line 3: We import Vue router from vue-router first.
Line 9: Then we register route for User management module.
Line 18: Next we create local registration of router property, so we can import it within app.js (our root Vue instance).
Edit /resources/js/app.js.
At the bottom of this script, You'll see code for instantiating Vue.
Add router property to Vue instance like below.
const app = new Vue({
router, // add router property to Vue instance
el: '#app',
});
Save app.js file.
CLI will return "Module not found" error because we haven't yet created UserManagement module. We'll create it later after installing other necessary Vue packages.
Install Vue axios.
Axios is a promise-based HTTP client known for its capability to integrate HTTP clients into workflow. This package will help us to perform CRUD operations without reloading our webpage.
Run npm install axios --save to install Vue axios.
Install vform.
We'll install vform package so it'll be easy for us to handle Laravel back-end validation in Vue.
Run npm install vform to install vform.
Edit resources /js/app.js then add the following code right after window.Vue = require('vue');.
// Import /Form, /HasError, /AlertError from /vform first.
import { Form, HasError, AlertError } from 'vform'

// Then register /HasError and /AlertError as component (so we can use them as tag later in our HTML).
Vue.component(HasError.name, HasError)
Vue.component(AlertError.name, AlertError)

// Next, set /window.form as /Form so we can instantiate /Form later within our component.
window.Form = Form;
Source code explanation
Import Form, HasError, AlertError from vform first. Then register HasError and AlertError as components so we can use them as tags later in our HTML. Next, set window.form as Form so we can instantiate Form later within our component.
Install Laravel Vue pagination.
Laravel Vue pagination is a Vue component for Laravel's built-in paginator. This package uses Bootstrap framework so we don't have to worry about the looks of pagination on our page.
Run npm install laravel-vue-pagination --save to install Vue pagination.
Edit /resources/js/app.js then add the following code right after window.Form = Form;.
Vue.component('pagination', require('laravel-vue-pagination')); // Register /pagination as component
Install sweet alert.
Sweet alert 2 is a popular alert modal package you can found at unpkg and jsDelivr. We'll use this package to create alert messages (e.g. transaction successful, transaction failed, delete record confirmations, etc).
Run npm install sweetalert2 to install Sweet alert.
Edit resources/js/app.js then add the following code right after Vue pagination code.
// Import /swal from /sweetalert2 first.
import swal from 'sweetalert2';

// Then, set /window.swal as /swal so we can instantiate /swal later within our component.
window.swal = swal;
Source code explanation.
Import swal from sweetalert2 first. Then, set window.swal as swal so we can instantiate swal later within our component.
Step 5: Setup Frontend - Vue Component for User Management Module
Vue uses component-based approach to build UI. It's like having a parent layout extended by a child (component). Parent layout will contain HTML we want to extend (commonly header, footer, and sidebar). Here our parent layout would be laravel_vue_js_crud_spa.blade.php (which we've already created earlier). Now we're creating a child (component) to extend our parent layout.
Inside /resources/js/components folder, create UserManagement.vue.

Edit /resources/js/components/UserManagement.vue and paste the following code.
<!-- We put our HTML code inside template tag -->
<template>
  <div class="row">
    <div class="col-12">
      <div class="card">
        <div class="card-header">
          <h3 class="card-title">Users</h3>
          <div class="card-tools">
            <div class="input-group input-group-sm">
              <!-- Button "add new user". When clicked, it will call /showModal function (function to display modal pop up containing "add new user" form). -->
              <button type="submit" class="btn btn-primary" data-toggle="modal" data-target="#exampleModal" @click.prevent="showModal"><i class="fas fa-user-plus"></i>Add new user</button>
            </div>
          </div>
        </div>
        <div class="card-body table-responsive p-0">
          <!-- Data-table with pagination for user list. -->
          <table class="table table-hover">
            <thead>
              <tr>
                <th>Name</th>
                <th>Email</th>
                <th></th>
              </tr>
            </thead>
            <tbody>
              <!-- Loop through each user record and display user details -->
              <tr v-for="user in users.data" :key="user.id">
                <td class="align-middle">{{ user.name }}</td>
                <td class="align-middle">{{ user.email }}</td>
                <td class="align-middle">
                  <a href="" @click.prevent="editUser(user)">
                    <i class="fa fa-edit"></i>
                  </a>
                  <a href="" @click.prevent="deleteUser(user.id)">
                    <i class="fa fa-trash"></i>
                  </a>
                </td>
              </tr>
            </tbody>
          </table>
          <nav aria-label="Page navigation example" class="pagination-container">
            <pagination :data="users" @pagination-change-page="getUsers"></pagination>
          </nav>
        </div>
      </div>
    </div>

    <!-- Modal containing dynamic form for adding/updating user details. -->
    <div class="modal fade" id="exampleModal" tabindex="-1" role="dialog" aria-labelledby="exampleModalLabel" aria-hidden="true">
      <div class="modal-dialog modal-dialog-centered" role="document">
        <div class="modal-content">
          <div class="modal-header">
            <!-- Show/hide headings dynamically based on /isFormCreateUserMode value (true/false) -->
            <h5 v-show="isFormCreateUserMode" class="modal-title" id="exampleModalLabel">Add new user</h5>
            <h5 v-show="!isFormCreateUserMode" class="modal-title" id="exampleModalLabel">Update user</h5>
            <button type="button" class="close" data-dismiss="modal" aria-label="Close">
              <span aria-hidden="true">×</span>
            </button>
          </div>
          <!-- Form for adding/updating user details. When submitted call /createUser() function if /isFormCreateUserMode value is true. Otherwise call /updateUser() function. -->
          <form @submit.prevent="isFormCreateUserMode ? createUser() : updateUser()">
            <div class="modal-body">
              <div class="form-group">
                <input v-model="form.name" type="text" name="name" placeholder="Name"
                  class="form-control" :class="{ 'is-invalid': form.errors.has('name') }">
                  <has-error :form="form" field="name"></has-error>
              </div>
              <div class="form-group">
                <input v-model="form.email" type="email" name="name" placeholder="Email"
                  class="form-control" :class="{ 'is-invalid': form.errors.has('email') }">
                  <has-error :form="form" field="email"></has-error>
              </div>
              <div class="form-group">
                <input v-model="form.password" type="password" name="password" placeholder="Password"
                  class="form-control" :class="{ 'is-invalid': form.errors.has('password') }">
                  <has-error :form="form" field="password"></has-error>
              </div>
            </div>
            <div class="modal-footer">
              <button type="button" class="btn btn-secondary" data-dismiss="modal">Close</button>
              <button type="submit" class="btn btn-primary" v-show="isFormCreateUserMode">Save changes</button>
              <button type="submit" class="btn btn-primary" v-show="!isFormCreateUserMode">Update</button>
            </div>
          </form>
        </div>
      </div>
    </div>
  </div>
</template>

<!-- We put our scripts inside script tag -->
<script>
  // Declare /user-management component
  export default {
    name: 'user-management',
    // Declare users (as object), form (as /vform instance) and /isFormCreateUserMode (as boolean defaulted to 'true') inside /data() { return {} }.
    data() {
      return {
        users: {},
        form: new Form({
          id: '',
          name: '',
          email: '',
          password: ''
        }),
        isFormCreateUserMode: true
      }
    },

    methods: {
      // /getUsers() function. Function we use to get user list by calling api/users method GET.
      getUsers(page) {
        if (typeof page === 'undefined') {
          page = 1;
        }

        axios.get('api/users', {
          params: {
            page: page
          }
        }).then(data => {
          this.users = data.data;
        });
      },
      // /showModal() function. Function we use to 1. Set /isFormCreateUserMode to 'true', 2. Reset form data, 3. Show modal containing dynamic form for adding/updating user details.
      showModal() {
        this.isFormCreateUserMode = true;
        this.form.reset(); // v form reset
        $('#exampleModal').modal('show'); // show modal
      },
      // /createUser() function. Function we use to store user details by calling api/users method POST (carrying form input data).
      createUser() {
        // request post
        this.form.post('api/users', {
        }).then(() => {
          $('#exampleModal').modal('hide'); // hide modal

          // sweet alert 2
          swal.fire({
            icon: 'success',
            title: 'User created successfully'
          })

          this.getUsers();

        }).catch(() => {
          console.log('transaction fail');
        });
      },
      // /editUser() function. Function we use to 1. Set /isFormCreateUserMode to 'false', 2. Reset and clear form data, 3. Show modal containing dynamic form for adding/updating user details, 4. Fill form with user details.
      editUser(user){
        this.isFormCreateUserMode = false;
        this.form.reset(); // v form reset inputs
        this.form.clear(); // v form clear errors
        $('#exampleModal').modal('show'); // show modal
        this.form.fill(user);
      },
      // /updateUser() function. Function we use to update user details by calling api/users/{id} method PUT (carrying form input data).
      updateUser(){
        // request put
        this.form.put('api/users/' + this.form.id, {
        }).then(() => {
          $('#exampleModal').modal('hide'); // hide modal

          // sweet alert 2
          swal.fire({
            icon: 'success',
            title: 'User updated successfully'
          })

          this.getUsers();
        }).catch(() => {
          console.log('transaction fail');
        });
      },
      // /deleteUser() function. Function we use to delete user record by calling api/users/{id} method DELETE.
      deleteUser(id) {
        // sweet alert confirmation
        swal.fire({
          title: 'Are you sure?',
          text: "You won't be able to revert this!",
          icon: 'warning',
          showCancelButton: true,
          confirmButtonColor: '#3085d6',
          cancelButtonColor: '#d33',
          confirmButtonText: 'Yes, delete it!'
        }).then((result) => {
          // confirm delete?
          if (result.value) {
            // request delete
            this.form.delete('api/users/' + id, {
            }).then(() => {
              // sweet alert success
              swal.fire(
                'Deleted!',
                'Your file has been deleted.',
                'success'
              )

              this.getUsers(); // reload table users
            }).catch(() => {
              // sweet alert fail
              swal.fire({
                icon: 'error',
                title: 'Oops...',
                text: 'Something went wrong!',
                footer: '<a href>Why do I have this issue?</a>'
              })
            });
          }
        })
      }
    },
    created() {
      // Call /getUsers() function initially.
      this.getUsers();
    },
    mounted() {
      console.log('Component mounted.')
    }
  }
</script>

<!-- We put our custom css/scss inside style (type can be css or scss) -->
<style type="scss">
  .pagination-container {
    height: 75px;
    display: grid;
  }
  .pagination {
    margin: auto !important;
  }
</style>
Source code explanation (We only explain Vue scripts thus HTML code's pretty much straight forward).
Line 98 - Declare users (as object), form (as vform instance) and isFormCreateUserMode (as boolean defaulted to 'true') inside data() { return {} }.
Line 113 - getUsers() function. The function we use to get user list by calling api/users method GET.
Line 127 - showModal() function. Function we use to 1. Set isFormCreateUserMode to 'true', 2. Reset form data, 3. Show modal containing dynamic form for adding/updating user details.
Line 152 - editUser() function. The function we use to 1. Set isFormCreateUserMode to 'false', 2. Reset and clear form data, 3. Show modal containing a dynamic form for adding/updating user details, 4. Fill the form with user details.
Line 160 - updateUser() function. Function we use to update user details by calling api/users/{id} method PUT (carrying form input data).
Line 178 - deleteUser() function. Function we use to delete user record by calling api/users/{id} method DELETE.
Line 217 - Call getUsers() function initially.
Now we have our User Management component. This component is an independent unit of an interface that has its own state, markup and style.
Wrapping Things Up
At the end of this tutorial, you should have your User Management CRUD SPA working.
Now you should have a better understanding of how Laravel and Vue Js works.
You should also have the grasp on:
- Setting up backend with Laravel -- creating RESTful APIs.
- Setting up frontend with Vue and making it beautiful using AdminLTE, Bootstrap, and Font awesome.
- Integrating RESTful APIs to Vue components using Axios.
- Using SPA approach -- switching between pages, performing CRUD operations without reloading the page using Vue router.
- Validating form input using VForm.
- Working with Laravel's built-in paginator using Laravel Vue pagination package.
- Creating interactive alert messages using Sweet alert.
Surely you'll see lots of Laravel Vue JS CRUD SPA tutorial out there and each one uses a different approach.
If you found a better approach, let us know! Just comment below.
Hello,
Thanks for this tutorial, very nice and helpful though. I follow the step by step guide but I encountered an error. It says Router is not defined. Also, looking forward to hear from you. Thanks again
Hi Arkad25,
Can you verify if the resourceful route declared correctly?
To check resource route available actions, please run the following command:
run php artisan route:list command
Also, have you tried conducting a test using Postman app to check if APIs working?
Thanks for your prompt reply. By the way, do you have the repo of this full tutorial? I just followed everything in your but I got stucked of how to run it from login to dashboard. I appreciate it if you would give a git repo so that I can compare the codes. Thanks a lot.
Hi Arkad25,
I lost access to our repo after I moved to another company.
But I’ll create one in near future.
Also, I must say that login here is just the default login mechanism of Laravel, upon successful login we just redirected the user to the single page app where they can perform CRUD.
Thank you.
Got it working bro. Thanks for your very responsive in the comment. Anyway, I try to log out then press the back button in the browser. It will go back to the previous page (SPA page) and still do the functionalities even if its logged out. You also have that experience too?
Hi Arkad25, that’s good news!
For your other concern, I honestly haven’t had the chance to apply security to the SPA page. But I know it can be done, let’s try both on our ends to A. Apply security to SPA page & B. Apply security to the APIs. : )
Let me know if you can suggest a solution, thank you!
Please complete the tutorial by adding part include:
those should be used in conjunction with the router-path to usermanagement…
Otherwise, there will be no user management console will be shown!!!