

Last updated on September 11th, 2021
Custom Sliders with Advanced Custom Fields & ACF Photo Gallery
Here in this tutorial, we'll share with you how you can create your custom slider and image gallery using Advanced Custom Fields and ACF Photo Gallery plugin.
Our main goals are:
- To add a custom field -- "slider"/"photo gallery" field to your post, custom post, or page. We'll make your "slider"/"photo gallery" field available in your WordPress admin UI -- when you're adding, editing your post/page.
- To display your images in frontend as a carousel slider, as a fullwidth slider, or as an image gallery. We'll let you choose if you want to display your images in your theme's template or with a shortcode.
For this demo, we're going to create a custom post type "Books". Next, we'll add a custom field "slider photo gallery" onto it. Then, we'll customize our child theme's template (content-single.php) to display our book details with its images/photos in a carousel slider, in a fullwidth slider, and in an image gallery. Additionally, we'll create the following shortcodes: [carouselslider], [fullwidthslider], and [imagegallery] -- useful if you want to paste shortcode/s in your post/page to display your images instead of editing your theme's template.
Before Anything Else
- We strongly suggest you backup your WordPress website first before making any changes. You can backup your site using WP backup plugins such's Duplicator, All in One WP Migration, etc.; or manually backup your WordPress site if you're not allowed to install those plugins.
- We also recommend you create your child theme first if you don't have one yet.
Here are the things we need or we'll use for this tutorial.
- (Optional) Custom Post Type UI plugin - You don't have to install this plugin if you're adding your "slider"/"photo gallery" field to WordPress default post/page. We only require you to install CPT UI if you'll create a custom post type first before you add your "slider"/"photo gallery" field onto it.
- Advanced Custom Fields plugin - We'll use ACF's field builder to quickly add the necessary fields we need to our post/page.
- ACF Photo Gallery plugin - We all know that ACF's extra fields such's "media galleries", "repeatable fields", etc. are only available in ACF PRO. As an alternative to ACF PRO's "media gallery" field, we're going to install ACF Photo Gallery plugin. With this lightweight extension, we'll be able to add a "photo gallery" field to any of our posts, custom posts, and pages. The "photo gallery" field will allow us to add/select multiple images/photos from the WordPress media library. Later we'll talk about ACF Photo Gallery's usage.
Additional Notes
- We're going to use the Twenty Twenty One theme (one of the WordPress default themes) here in this tutorial.
- Unlike slider plugin such's Smart Slider 3 where you have a visual editor to easily drag-and-drop elements (images, texts, etc.) (and customize everything); here we'll display our images/photos manually -- by customizing our child theme's template or by creating our own shortcode -- we'll write our code in PHP, HTML, CSS, and JavaScript. We'll make our code very simple so you'll be able to modify it easily to suit your needs.
Check out this demo below for you to have a clear understanding of what will be the output of this tutorial.

Steps to Create your Custom Sliders and Image Gallery using Advanced Custom Fields + ACF Photo Gallery
Step 1: (Optional step) Create your Custom Post Type Using CPT UI
Step 2: Add your Custom Field "Slider"/"Photo Gallery" to your Post Using ACF + ACF Photo Gallery
Step 3: Display your ACF Photo Gallery Field as a Carousel Slider
Step 4: Display your ACF Photo Gallery Field as a Fullwidth Slider
Step 5: Bonus: Display your ACF Photo Gallery Field as an Image Gallery (List of Images)
Step 1: Create your Custom Post Type Using CPT UI
Skip this step if you're going to add your "slider"/"photo gallery" field to WordPress default post/page.
For this demo, we're going to create a custom post type named "Books".
Install & Activate Custom Post Type UI Plugin

A. Sign in to your WordPress site.
B. From left sidebar of your WordPress dashboard, hover your mouse cursor to Plugins and click Add New. Search for "Custom Post Type UI", from Search Results you should see this plugin by WebDevStudios.
C. Hit Install Now button.
D. Activate the plugin after installation.
CPT UI tab should be visible now from your WordPress dashboard sidebar.
Create your Custom Post Type
A. From your WordPress dashboard, navigate to CPT UI > Add/Edit Post Types.
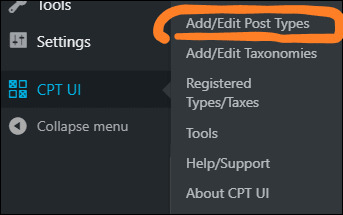
B. Add your new post type.
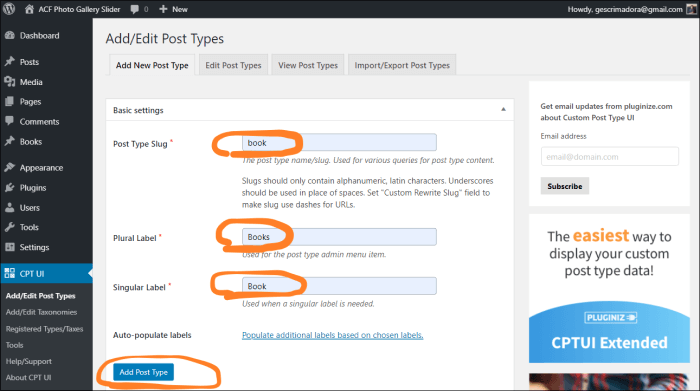
Here, you have to provide only the basic details of your custom post.
Refer to our example below.
- Post Type Slug: "book"
- Plural Label: "Books"
- Singular Label: "Book"
C. Click Add Post Type button.
Your new post type tab should be visible now from your WordPress dashboard sidebar.
Step 2: Add your "Slider"/"Photo Gallery" Custom Field to your Post with ACF & ACF Photo Gallery
Install & Activate Advanced Custom Fields Plugin
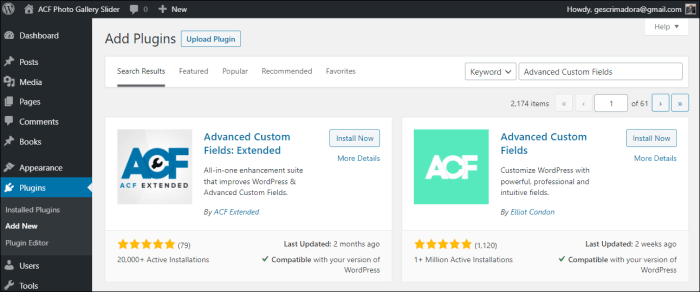
Again, hover your mouse cursor to Plugins and click Add New. Search for "Advanced Custom Fields", from Search Results you should see this plugin by Elliot Condon. Click Install Now button, then activate the plugin after installation.
Custom Fields tab should be visible now from your WordPress dashboard sidebar.
We can't add yet a "slider"/"photo gallery" custom field thus the free version of ACF doesn't support it. As we stated above, ACF free doesn't include extra fields such's "media galleries", "repeatable fields", etc., those fields are only available in ACF PRO. As an alternative solution, we'll install ACF Photo Gallery plugin -- ACF extension that adds a "photo gallery" field to our post/page.
Install & Activate ACF Photo Gallery Plugin
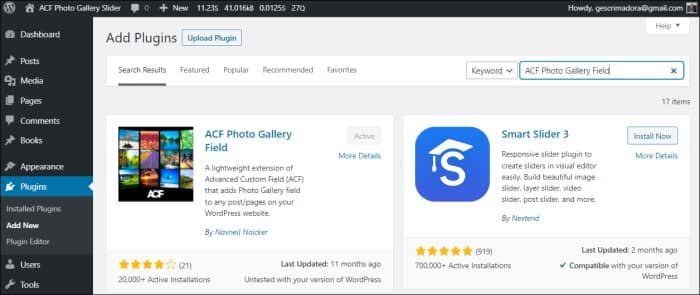
Again, from Plugins tab, click Add New. Search for "ACF Photo Gallery Field", from Search Results you should see this plugin by Navneil Naicker. Hit Install Now button, then activate the plugin after installation.
The Photo Gallery field should be available now when you're adding a new field group.
Add your "Slider"/"Photo Gallery" Field to your Post
For this demo, we'll name our "Photo Gallery" field as "slider photo gallery".
A. From your WordPress dashboard, navigate to Custom Fields > Add New.

B. Add your new field group.
Create your "slider photo gallery" field.
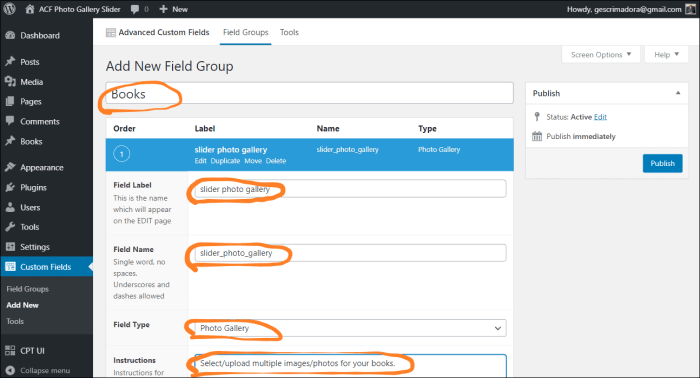
Here, you have to provide only the basic details of your custom field.
Check our example below.
- Field Label: "slider photo gallery"
- Field Name: "slider_photo_gallery"
- Field Type: "Photo Gallery"
- Instructions: "Select/upload multiple images/photos for this book."
We'll keep the default value of other field's settings.
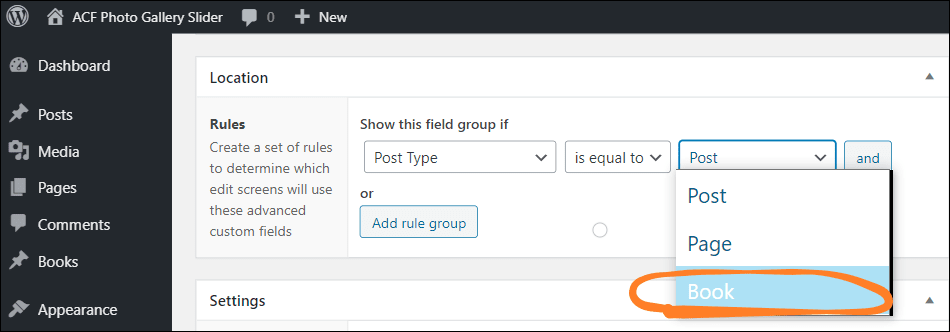
C. Set the location of your new field group.
Scroll down until you see the Location section settings.
Here we'll set a rule for WordPress to determine which edit screens it will show our custom fields.
For this demo, we'll add a rule to show this field group if: Post Type is equal to Book.
D. Click Publish button.
Your new field group should be visible now to the post/page that you've selected.
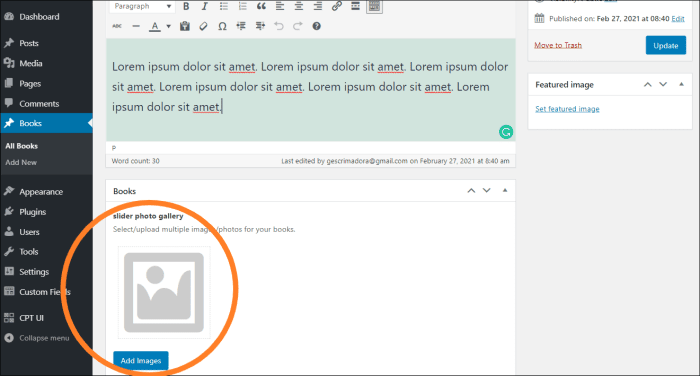
Start to publish some posts (in our case "books") so you have sample data to display.
Step 3: Display ACF Photo Gallery Field in a Carousel Slider

Display your Carousel Slider Using your Theme's Template
A. First, decide where you want to display your carousel slider, then determine which template file you should update.
For this demo, we'll display our carousel slider at the bottom of our post -- after the content ( the_content(); ).
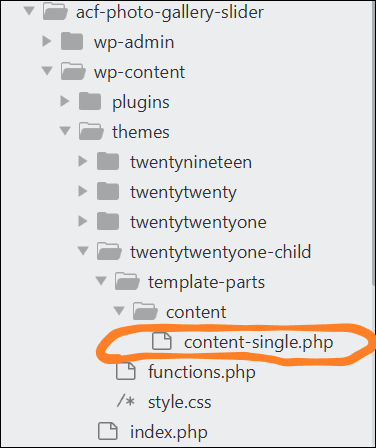
We're using Twenty Twenty One theme, so the file that we need to edit is content-single.php. It is located at /wp-content/themes/twentytwentyone/template-parts/content/ folder.
B. Next, make a copy of the template file (that you're going to edit) from your parent theme's folder to your child theme's folder.
You have to do this so your changes won't be overwritten once you update your theme.
We'll make a copy of content-single.php and place it inside Twenty Twenty One child theme's folder -- /wp-content/themes/twentytwentyone-child/template-parts/content/.
C. Then, paste the following code within your template file.
<h2 style='text-align: center;'>Display ACF Photo Gallery field as a Carousel Slider</h2>
<?php
// Get your images using "acf_photo_gallery" helper function; "acf_photo_gallery" query your database (gets your photo gallery images) and return them in an array format. This function requires 2 paramaters: 1. ACF_FIELD_NAME (the field name you set for your "slider"/"photo gallery"), 2. Post ID.
$images = acf_photo_gallery('slider_photo_gallery', $post->ID);

// In case the advanced custom fields photo gallery not showing in your frontend, uncomment this line of code to print out  $images array -- to check if we're getting something in our database.
// echo "<pre>";
// print_r($images);
// echo "</pre>";

// Check if the return array of "acf_photo_gallery" function has anything in it.
if( count($images) ) { ?>
<div id="carousel-wrapper">
	<div id="carousel">
		<div id="carousel-content">
      <?php
    	// Loop through array of images.
    	foreach($images as $image) {
    		// Get the following details for each image: id, title, caption, full image URL (full size image URL), thumbnail image URL (150px by 150px size image URL), image URL (link), target (open on same window or new tab), alt attribute, and class.
        $image_id = $image['id']; // The attachment id of the media
        $image_title = $image['title']; // The title
        $image_caption = $image['caption']; // The caption
        $image_full_url = $image['full_image_url']; // Full size image url
        // $image_full_url = acf_photo_gallery_resize_image($image_full_url, 262, 160); // Resized size image (262px by 160px) URL. If you don't want to use your full size image URL for your carousel slider, you can resize it using "acf_photo_gallery_resize_image" helper function. You may uncomment this line of code to set your preferred image width and height.
        $image_thumbnail_image_url = $image['thumbnail_image_url']; // Get the thumbnail size image url 150px by 150px
        $image_url = $image['url']; // Goto any link when clicked
        $image_target = $image['target']; // Open normal or new tab
        $image_alt = get_field('photo_gallery_alt', $image_id); // Get the alt which is a extra field (See below how to add extra fields)
        $image_class = get_field('photo_gallery_class', $image_id); // Get the class which is a extra field (See below how to add extra fields) ?>
        <!-- Insert each image (carousel slider image) into your HTML document with "img" tag. Set the "src" attribute value as "$image_full_url" (full size image URL). -->
		  	<div class="carousel-item">
		  		<img src="<?php echo $image_full_url?>">
		  	</div>
			<?php } ?>
			<!-- Add "preview" and "next" button. -->
		  <button id="prev">
			  <svg xmlns="http://www.w3.org/2000/svg" width="24" height="24" viewBox="0 0 24 24">
					<path fill="none" d="M0 0h24v24H0V0z"></path>
					<path d="M15.61 7.41L14.2 6l-6 6 6 6 1.41-1.41L11.03 12l4.58-4.59z"></path>
				</svg>
			</button>
		  <button id="next">
				<svg xmlns="http://www.w3.org/2000/svg" width="24" height="24" viewBox="0 0 24 24">
					<path fill="none" d="M0 0h24v24H0V0z"></path>
					<path d="M10.02 6L8.61 7.41 13.19 12l-4.58 4.59L10.02 18l6-6-6-6z"></path>
				</svg>
			</button>
		</div>
	</div>
</div>
<?php } else { ?> <p style='text-align: center;'>No images/photos found...</p>; <?php } ?>
Source code explanation
Line 4: Get your images using the "acf_photo_gallery" helper function; "acf_photo_gallery" query your database (gets your photo gallery images) and return them in an array format. This function requires 2 parameters: 1. ACF_FIELD_NAME (the field name you set for your "photo gallery"), 2. Post ID.
Line 7 to 9: In case the advanced custom fields photo gallery not showing in your frontend, uncomment this line of code to print out $images array -- to check if we're getting something in our database.
Line 12: Check if the return array of "acf_photo_gallery" function has anything in it.
Line 18: Loop through array of images.
Line 20 to 29: Get the following details for each image: id, title, caption, full image URL (full size image URL), thumbnail image URL (150px by 150px size image URL), image URL (link), target (open on same window or new tab), alt attribute, and class.
Line 24: Resized size image (262px by 160px) URL. If you don't want to use your full-size image URL for your carousel slider, you can resize it using "acf_photo_gallery_resize_image" helper function. You may uncomment this line of code to set your preferred image width and height.
Line 31: Insert each image (carousel slider image) into your HTML document with "img" tag. Set the "src" attribute value as "$image_full_url" (full size image URL).
Line 35: Add "preview" and "next" buttons.
D. After that, add the necessary CSS (carousel slider CSS) to your WordPress.
You can add your custom CSS in WordPress through Additional CSS.
From your WordPress dashboard, navigate to Appearance > Customize.
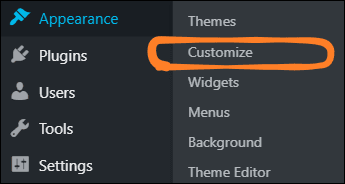
Select "Additional CSS" tab and paste the following CSS code.
/* __________ Carousel slider __________ */
#carousel-wrapper {
  width: 100%;
  max-width: 1400px;
  position: relative;
}

#carousel {
  overflow: auto;
  scroll-behavior: smooth;
  scrollbar-width: none;
}

#carousel::-webkit-scrollbar {
  height: 0;
}

#prev, #next {
  display: flex;
  justify-content: center;
  align-content: center;
  background: white;
  border: none;
  padding: 8px;
  border-radius: 50%;
  outline: 0;
  cursor: pointer;
  position: absolute;
}

#prev {
  top: 50%;
  left: 0;
  transform: translate(50%, -50%);
  display: none;
}

#next {
  top: 50%;
  right: 0;
  transform: translate(-50%, -50%);
}

#carousel-content {
  display: grid;
  grid-gap: 16px;
  grid-auto-flow: column;
  margin: auto;
  box-sizing: border-box;
}

.carousel-item {
  /*width: 268px;*/
  width: calc((100vw / 4) - 12px);
  max-width: none !important;
  /*height: 250px;*/
  height: auto;
  background: green;
}

.carousel-item p {
	display: -webkit-box;
  -webkit-line-clamp: 3;
  -webkit-box-orient: vertical;
  overflow: hidden;
  text-overflow: ellipsis;
  font-size: 12px;
}
E. Lastly, add the necessary JavaScript (carousel slider JavaScript) to your WordPress.
You can add your custom JavaScript in WordPress through functions.php.
Open your child theme's functions.php and paste the following JavaScript code.
add_action('wp_footer', 'script_carousel_slider');
function script_carousel_slider() {
	global $post;

	if( is_page() || is_single() ) {
    if (get_post_type( $post->ID ) === "book") { // Validate post type -- we only want to include this JavaScript code in our custom post "Book". Uncomment this line of code if you want to include this JavaScript code in all of your posts/pages.
  	?>
			<script type="text/javascript">
				const gap = 16;

				const carousel = document.getElementById("carousel"),
				  content = document.getElementById("carousel-content"),
				  next = document.getElementById("next"),
				  prev = document.getElementById("prev");

				next.addEventListener("click", e => {
				  carousel.scrollBy(width + gap, 0);
				  if (carousel.scrollWidth !== 0) {
				    prev.style.display = "flex";
				  }
				  if (content.scrollWidth - width - gap <= carousel.scrollLeft + width) {
				    next.style.display = "none";
				  }
				});

				prev.addEventListener("click", e => {
				  carousel.scrollBy(-(width + gap), 0);
				  if (carousel.scrollLeft - width - gap <= 0) {
				    prev.style.display = "none";
				  }
				  if (!content.scrollWidth - width - gap <= carousel.scrollLeft + width) {
				    next.style.display = "flex";
				  }
				});

				let width = carousel.offsetWidth;
				window.addEventListener("resize", e => (width = carousel.offsetWidth));
			</script>
  	<?php
    }
  }
}
If you don't want a from-scratch CSS and JavaScript code, you may want to display your slider in your WordPress page/post using slick slider here.
Display your Carousel Slider with a Shortcode
If you don't prefer to edit your theme's template to display your carousel slider, you may create your own shortcode instead -- through functions.php.
A. First, open your child theme's functions.php and paste the following code.
// ---------- Shortcode carousel slider
// On WordPress initialization, we'll register our shortcode [carouselslider] using WP "add_shortcode" built-in function.
add_action( 'init', 'register_shortcodes' );
function register_shortcodes() {
	add_shortcode( 'carouselslider', 'shortcode_carousel_slider' );
}

// Create your shortcode callback function
function shortcode_carousel_slider( $atts ) {
	global $post;

	$images = acf_photo_gallery('slider_photo_gallery', $post->ID);

	if( count($images) ) {
		$carousel_slider .= '<div id="carousel-wrapper">';
	  $carousel_slider .= 	'<div id="carousel">';
		$carousel_slider .= 		'<div id="carousel-content">';

  	foreach($images as $image) {
      $image_id = $image['id'];
      $image_title = $image['title'];
      $image_caption = $image['caption'];
      $image_full_url = $image['full_image_url'];
      $image_thumbnail_image_url = $image['thumbnail_image_url'];
      $image_url = $image['url'];
      $image_target = $image['target'];
      $image_alt = get_field('photo_gallery_alt', $image_id);
      $image_class = get_field('photo_gallery_class', $image_id);

	  	$carousel_slider .= 		'<div class="carousel-item">';
	  	$carousel_slider .= 			'<img src="' . $image_full_url . '">';
	  	$carousel_slider .= 		'</div>';
		}

	  $carousel_slider .= 			'<button id="prev">';
		$carousel_slider .= 			  '<svg xmlns="http://www.w3.org/2000/svg" width="24" height="24" viewBox="0 0 24 24">';
		$carousel_slider .= 					'<path fill="none" d="M0 0h24v24H0V0z"></path>';
		$carousel_slider .= 					'<path d="M15.61 7.41L14.2 6l-6 6 6 6 1.41-1.41L11.03 12l4.58-4.59z"></path>';
		$carousel_slider .= 				'</svg>';
		$carousel_slider .= 			'</button>';
	  $carousel_slider .= 			'<button id="next">';
		$carousel_slider .= 				'<svg xmlns="http://www.w3.org/2000/svg" width="24" height="24" viewBox="0 0 24 24">';
		$carousel_slider .= 					'<path fill="none" d="M0 0h24v24H0V0z"></path>';
		$carousel_slider .= 					'<path d="M10.02 6L8.61 7.41 13.19 12l-4.58 4.59L10.02 18l6-6-6-6z"></path>';
		$carousel_slider .= 				'</svg>';
		$carousel_slider .= 			'</button>';
  	$carousel_slider .= 		'</div>';
  	$carousel_slider .= 	'</div>';
		$carousel_slider .= '</div>';

		return $carousel_slider;
	}

	return '<p style="text-align: center;">No images/photos found...</p>';
}
Source code explanation
The code above is quite identical to the PHP code we use to display the carousel slider from our theme's template. The only difference is, we have to declare global $post; variable to be able to access $post->ID directly in functions.php -- see how we pass $post->ID in "acf_photo_gallery" helper function. Also, when creating a shortcode, it's not a best practice to display the content directly (using "print" or "echo"), you should use "return" instead to output your content.
Line 3: On WordPress initialization, we'll register our shortcode [carouselslider] using WP "add_shortcode" built-in function.
Line 9: Create your shortcode callback function.
B. Next, use your shortcode to display your carousel slider.
We've already added the necessary CSS and JavaScript code (for our carousel slider) earlier; so the only thing we need to do is to use this shortcode to our post.
Add/edit your post and paste your carousel slider shortcode inside the WYSIWYG editor.

C. Click the Publish/Update button to publish/update your post.
Now, your carousel slider should be displayed along with your post content.
Step 4: Display ACF Photo Gallery Field in a Fullwidth Slider

Display your Fullwidth Slider Using your Theme's Template
The steps below will be similar to how we displayed the ACF photo gallery field as a carousel slider.
A. For this demo, we'll display our fullwidth slider at the bottom of our post -- after the content ( the_content(); ); so the file that we need to update still is content-single.php. Earlier, we've already created a copy of that template file from our parent theme's folder to our child theme's folder; so the only thing we need to do is to paste the following code within that template file.
<h2 style='text-align: center;'>Display ACF Photo Gallery field as a Fullwidth Slider</h2>
<?php
$images = acf_photo_gallery('slider_photo_gallery', $post->ID);

if( count($images) ) { ?>
<div class="slideshow-container">
  <?php
	foreach($images as $image) {
    $image_id = $image['id'];
    $image_title = $image['title'];
    $image_caption = $image['caption'];
    $image_full_url = $image['full_image_url'];
    // $image_full_url = acf_photo_gallery_resize_image($image_full_url, 262, 160);
    $image_thumbnail_image_url = $image['thumbnail_image_url'];
    $image_url = $image['url'];
    $image_target = $image['target'];
    $image_alt = get_field('photo_gallery_alt', $image_id);
    $image_class = get_field('photo_gallery_class', $image_id); ?>
		<div class="mySlides fade">
		  <img src="<?php echo $image_full_url?>" style="width:100%">
		  <div class="text"><?php echo $image_caption ?></div>
		</div>
	<?php } ?>
	<a class="prev" onclick="plusSlides(-1)">❮</a>
	<a class="next" onclick="plusSlides(1)">❯</a>
</div>
<?php } else { ?> <p style='text-align: center;'>No images/photos found...</p>; <?php } ?>
B. Next, add the required CSS (fullwidth slider CSS) to your WordPress.
Just like what we've said earlier, you can add your custom CSS code in WordPress through Additional CSS.
/* __________ Fullwidth slider __________ */
.mySlides {display: none}
img {vertical-align: middle;}

/* Slideshow container */
.slideshow-container {
  /*max-width: 1000px;*/
	max-width: 100% !important;
  position: relative;
  margin: auto;
}

/* Next & previous buttons */
.prev, .next {
  cursor: pointer;
  position: absolute;
  top: 50%;
  width: auto;
  padding: 16px;
  margin-top: -22px;
  color: white;
  font-weight: bold;
  font-size: 18px;
  transition: 0.6s ease;
  border-radius: 0 3px 3px 0;
  user-select: none;
}

/* Position the "next button" to the right */
.next {
  right: 0;
  border-radius: 3px 0 0 3px;
}

/* On hover, add a black background color with a little bit see-through */
.prev:hover, .next:hover {
  background-color: rgba(0,0,0,0.8);
}

/* Caption text */
.text {
  color: #f2f2f2;
  font-size: 15px;
  padding: 8px 12px;
  position: absolute;
  bottom: 8px;
  width: 100%;
  text-align: center;
}

/* Number text (1/3 etc) */
.numbertext {
  color: #f2f2f2;
  font-size: 12px;
  padding: 8px 12px;
  position: absolute;
  top: 0;
}

/* The dots/bullets/indicators */
.dot {
  cursor: pointer;
  height: 15px;
  width: 15px;
  margin: 0 2px;
  background-color: #bbb;
  border-radius: 50%;
  display: inline-block;
  transition: background-color 0.6s ease;
}

.active, .dot:hover {
  background-color: #717171;
}

/* Fading animation */
.fade {
  -webkit-animation-name: fade;
  -webkit-animation-duration: 1.5s;
  animation-name: fade;
  animation-duration: 1.5s;
}

@-webkit-keyframes fade {
  from {opacity: .4}
  to {opacity: 1}
}

@keyframes fade {
  from {opacity: .4}
  to {opacity: 1}
}

/* On smaller screens, decrease text size */
@media only screen and (max-width: 300px) {
  .prev, .next,.text {font-size: 11px}
}
C. Then, add the required JavaScript (fullwidth slider JavaScript) to your WordPress.
As we stated above, you can add your custom JavaScript code in WordPress through functions.php.
Paste the following JavaScript code in your child theme's functions.php.
add_action('wp_footer', 'script_fullwidth_slider');
function script_fullwidth_slider() {
	global $post;

	if( is_page() || is_single() ) {
    if (get_post_type( $post->ID ) === "book") { // Validate post type -- we only want to include this JavaScript code in our custom post "Book". Uncomment this line of code if you want to include this JavaScript code in all of your posts/pages.
  	?>
			<script type="text/javascript">
				var slideIndex = 1;
				showSlides(slideIndex);

				function plusSlides(n) {
				  showSlides(slideIndex += n);
				}

				function currentSlide(n) {
				  showSlides(slideIndex = n);
				}

				function showSlides(n) {
				  var i;
				  var slides = document.getElementsByClassName("mySlides");
				  var dots = document.getElementsByClassName("dot");
				  if (n > slides.length) {slideIndex = 1}
				  if (n < 1) {slideIndex = slides.length}
				  for (i = 0; i < slides.length; i++) {
				      slides[i].style.display = "none";
				  }
				  for (i = 0; i < dots.length; i++) {
				      dots[i].className = dots[i].className.replace(" active", "");
				  }
				  slides[slideIndex-1].style.display = "block";
				  dots[slideIndex-1].className += " active";
				}
			</script>
  	<?php
    }
  }
}
Now, your fullwidth slider should be displayed right after the content of your post.
Display your Fullwidth Slider with a Shortcode
Let's create our fullwidth slider shortcode first.
A. Again, open your child theme's functions.php and paste the following code.
// ---------- Shortcode fullwidth slider
// On WordPress initialization, we'll register our shortcode [fullwidthslider] using WP "add_shortcode" built-in function.
add_action( 'init', 'register_shortcodes_1' );
function register_shortcodes_1() {
	add_shortcode( 'fullwidthslider', 'shortcode_fullwidth_slider' );
}

// Create your shortcode callback function
function shortcode_fullwidth_slider( $atts ) {
	global $post;

	$images = acf_photo_gallery('slider_photo_gallery', $post->ID);

	if( count($images) ) {
		$fullwidth_slider .= '<div class="slideshow-container">';

  	foreach($images as $image) {
      $image_id = $image['id'];
      $image_title = $image['title'];
      $image_caption = $image['caption'];
      $image_full_url = $image['full_image_url'];
      // $image_full_url = acf_photo_gallery_resize_image($image_full_url, 262, 160);
      $image_thumbnail_image_url = $image['thumbnail_image_url'];
      $image_url = $image['url'];
      $image_target = $image['target'];
      $image_alt = get_field('photo_gallery_alt', $image_id);
      $image_class = get_field('photo_gallery_class', $image_id);

			$fullwidth_slider .= '<div class="mySlides fade">';
			$fullwidth_slider .=   '<img src="' . $image_full_url . '" style="width:100%">';
			$fullwidth_slider .=   '<div class="text"><?php echo $image_caption ?></div>';
			$fullwidth_slider .= '</div>';
		}

		$fullwidth_slider .= 	'<a class="prev" onclick="plusSlides(-1)">❮</a>';
		$fullwidth_slider .= 	'<a class="next" onclick="plusSlides(1)">❯</a>';
		$fullwidth_slider .= '</div>';

		return $fullwidth_slider;
	}

	return '<p style="text-align: center;">No images/photos found...</p>';
}
Source code explanation
Line 3: On WordPress initialization, we'll register our shortcode [fullwidthslider] using WP "add_shortcode" built-in function.
Line 9: Again, create your shortcode callback function.
B. Next, use your shortcode to display your fullwidth slider.
We've already added the required CSS and JavaScript code (for our fullwidth slider); that means we can already use the shortcode to our post.
Add/edit your post and paste your fullwidth slider shortcode inside the WYSIWYG editor.

C. Click the Publish/Update button to publish/update your post.
Now, your fullwidth slider should be displayed together with your post content.
Step 5: Bonus: Display ACF Photo Gallery Field in an Image Gallery (List of Images)

Display your Image Gallery from your Theme's Template
The steps below will be similar to how we displayed the ACF photo gallery field as a carousel slider and as a fullwidth slider.
A. For this demo, we'll display our image gallery (list of images) at the bottom of our post. We'll paste the following code within our template file.
<h2 style='text-align: center;'>Display ACF Photo Gallery field as an Image Gallery</h2>
<?php
$images = acf_photo_gallery('slider_photo_gallery', $post->ID);

if( count($images) ) { ?>
<div class="container">
  <?php
	foreach($images as $image) {
    $image_id = $image['id'];
    $image_title = $image['title'];
    $image_caption = $image['caption'];
    $image_full_url = $image['full_image_url'];
    // $image_full_url = acf_photo_gallery_resize_image($image_full_url, 262, 160);
    $image_thumbnail_image_url = $image['thumbnail_image_url'];
    $image_url = $image['url'];
    $image_target = $image['target'];
    $image_alt = get_field('photo_gallery_alt', $image_id);
    $image_class = get_field('photo_gallery_class', $image_id); ?>
		<div class="galleryItem">
			<a href="<?php echo $image_full_url ?>"><img src="<?php echo $image_full_url ?>" alt="" /></a> <!-- Put the "img" (image) tag inside the "a" (anchor) tag ("href" attribute value should be your full image URL) to make a lightbox effect for your ACF gallery. -->
		</div>
	<?php } ?>
</div>
<br>
<?php } else { ?> <p style='text-align: center;'>No images/photos found...</p>; <?php } ?>
Source code explanation
Line 20: Put the "img" (image) tag inside the "a" (anchor) tag ("href" attribute value should be your full image URL) to make a lightbox effect for your ACF gallery.
B. Next, add the necessary CSS (image gallery CSS) to your WordPress.
Paste the following CSS code to your WordPress.
/* __________ Image Gallery __________ */
.container {
  width: 100%;
  max-width: 1200px !important;
}

.galleryItem {
	color: #797478;
	font: 10px/1.5 Verdana, Helvetica, sans-serif;
	float: left;
}

.galleryItem h3 {
	text-transform: uppercase;
}

.galleryItem img {
	max-width: 100%;
  -moz-border-radius: 5px;
  width: calc(100vw / 3);
  padding: 10px;
}
Now, your image gallery should be displayed right after the content of your post.
Display your Image Gallery with a Shortcode
Let's add our image gallery shortcode first in functions.php.
A. Again, open your child theme's functions.php and paste the following code.
// ---------- Shortcode image gallery
// On WordPress initialization, we'll register our shortcode [imagegallery] using WP "add_shortcode" built-in function.
add_action( 'init', 'register_shortcodes_2' );
function register_shortcodes_2() {
	add_shortcode( 'imagegallery', 'shortcode_imagegallery_slider' );
}

// Create your shortcode callback function
function shortcode_imagegallery_slider( $atts ) {
	global $post;

	$images = acf_photo_gallery('slider_photo_gallery', $post->ID);

	if( count($images) ) {
		$image_gallery .= '<div class="container">';

  	foreach($images as $image) {
      $image_id = $image['id'];
      $image_title = $image['title'];
      $image_caption = $image['caption'];
      $image_full_url = $image['full_image_url'];
      // $image_full_url = acf_photo_gallery_resize_image($image_full_url, 262, 160);
      $image_thumbnail_image_url = $image['thumbnail_image_url'];
      $image_url = $image['url'];
      $image_target = $image['target'];
      $image_alt = get_field('photo_gallery_alt', $image_id);
      $image_class = get_field('photo_gallery_class', $image_id);

			$image_gallery .= '<div class="galleryItem">';
			$image_gallery .= 	'<a href="' . $image_full_url . '"><img src="' . $image_full_url . '" alt="" /></a>'; // Put the "img" (image) tag inside the "a" (anchor) tag ("href" attribute value should be your full image URL) to make a lightbox effect for your ACF gallery.
			$image_gallery .= '</div>';
		}

		$image_gallery .= '</div>';

		return $image_gallery;
	}

	return '<p style="text-align: center;">No images/photos found...</p>';
}
Source code explanation
Line 3: On WordPress initialization, we'll register our shortcode [imagegallery] using WP "add_shortcode" built-in function.
Line 9: Next, create your shortcode callback function.
B. Then, use your shortcode to display your image gallery (list of images).
We've already added the necessary CSS (for our image gallery); it means we can already use the shortcode to our post.
Add/edit your post and paste your image gallery shortcode inside the WYSIWYG editor.
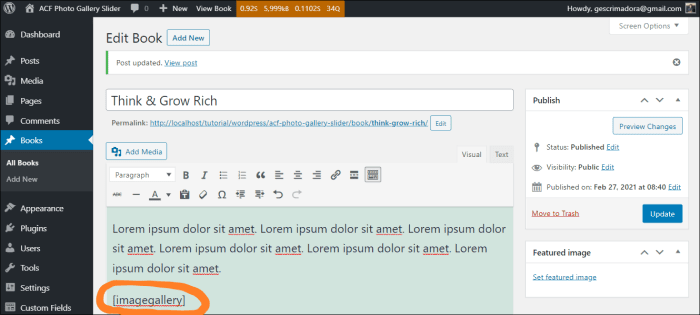
C. Click the Publish/Update button to publish/update your post.
Now, your image gallery should be displayed along with your post content.
What we have Learned
At the end of this tutorial, you should have your custom slider/s and/or image gallery displayed in the frontend of your WordPress website. Now you've learned how you can display ACF Photo Gallery field images/photos manually by customizing your child theme's template and by creating your own shortcode -- writing your code in PHP, HTML, CSS, and JavaScript.
Also, you should be able to add the "slider"/"photo gallery" custom field to your post, custom post, or page without purchasing ACF PRO. Thanks to ACF Photo Gallery plugin, an ACF extension that adds a "photo gallery" field to WordPress post/page, a 100% free alternative to ACF PRO's "media gallery".
Related: Display your slider in WordPress using slick slider (no plugin required)
THANK YOU! Was searching for a way to do this and most explanations were not this thorough. Saved me hours of work thank you thank you.
You’re very welcome, Ak.
Can you tell me how to embed a gallery of images into the divi builder?
First, insert a “Code” module, then enter the shortcode to the “Content” input box.
Hi,
Thanks so much for sharing your code, it works great!
Curious to know if there is a relatively easy way to have the images slide automatically after a certain time elapses.
Thanks,
Jenny
Hi Jenny!
If you want to have the auto-slide option for your slider you may consider using slick slider instead.
Here’s how you can use slick in WordPress: https://scriptwriterph.com/wordpress/slick-slider-wordpress/