

Last updated on April 26th, 2021
WebinarPress (WordPress Webinar Plugin) Walkthrough 2021
These past few months, we've had 3 WordPress projects that require a webinar system. Since all of those projects are built on top of WordPress, we can simply use a webinar plugin, right? That's what we thought -- we just have to search for a webinar plugin, install it, and use it. Well, ... after couple of hours of searching the internet for webinar plugins, we realized that it's not that easy to find a wp webinar system that'll really suit your (client) requirements.
You have to be smarter when choosing the right webinar solution for you. You have to consider its:
1. Features and functionalities. Can the webinar plugin support the basic requirements of your client? Aside from the webinar itself, some of the basic features your client may need are Registration, Mailing list integration (MailChimp, Drip, etc.), and Payment integration (PayPal, Stripe, etc.).
2. Usability. Is the webinar system user-friendly? Is it easy to operate?
3. Price. Does your client have the budget for the webinar system that you're planning to purchase? If Yes, is it worth their dime?
4. Some technical concerns.
A. Server resource usage. How much server resource (RAM, CPU, disk usage) the webinar plugin consumes? If they offer a free/trial version, you may want to check it out.
B. Server specifications. With the current server specs that you have, (considering the server resource usage of the webinar plugin) do you think it'll be able to handle X no. of visitors that'll watch your webinar simultaneously?
We've tried 3 of the most popular WordPress webinar plugins out there named Video Conferencing with Zoom, eRoom – Zoom Meetings & Webinar, and WebinarPress. All of them are really awesome, they're all recommended, but we have to choose one -- one that's well-suited to our (client) requirements -- and that is WebinarPress.
Here in this article, we'll walk you through WebinarPress -- its basic usage, creating and broadcasting your very first webinar, customizing your webinar (basic to advanced customization), etc. Lastly, we'll give you our honest opinion regarding the question "Is WebinarPress really worth your $197/year?".
Note: We're using the WebinarPress Pro version in this tutorial. But don't worry we'll distinct which features are FREE and which are only available in the Pro version.
Summary
Install and activate WebinarPress plugin
- Create your very first webinar
- Broadcast your webinar live
- Customize your pages (registration, webinar, etc.)
- WebinarPress advanced settings (access control, custom fields, etc.)
- Customize your email templates (new registration, confirmation, etc.)
- Import/Export your WebinarPress settings
- Export your attendees, chat logs, and questions to CSV
Is WebinarPress really worth your $197/year?
Upgrade your WebinarPress to Pro
Install & Activate WebinarPress Plugin
Before you purchase WebinarPress Pro, we recommend you try it out first and have a glimpse of it.
Install the free/lite version of WebinarPress and see what's available.
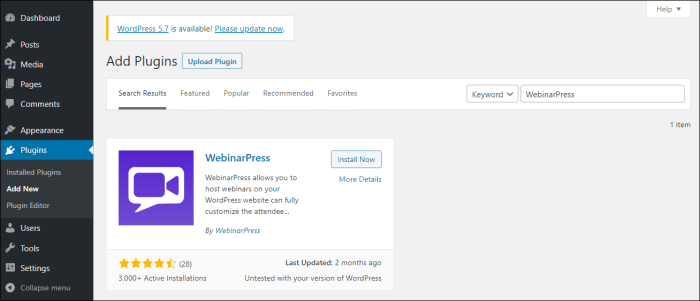
1. Sign in to your WordPress site.
2. From left sidebar of your WordPress dashboard, hover your mouse cursor to Plugins and click Add New. Search for "WebinarPress", from Search Results you should see this plugin by WebinarPress.
3. Hit the Install Now button.
4. Activate the plugin after installation.
WebinarPress tab should be visible now from your WordPress dashboard sidebar. 🤘
WebinarPress Walkthrough
How to Create your First Webinar in WebinarPress?
For this demo, we'll create a webinar where the video source is from YouTube (pre-recorded video).
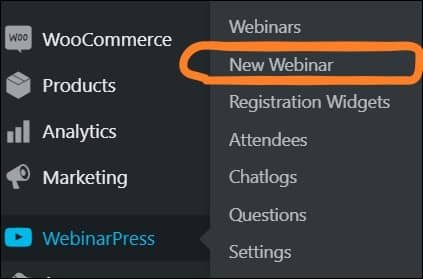
1. From left sidebar of your WordPress dashboard, hover your mouse cursor to WebinarPress and click New Webinar.
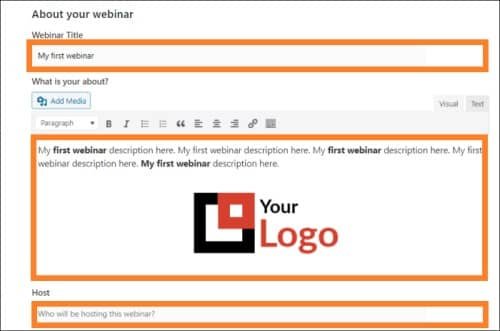
2. Provide the basic details of your webinar.
A. Enter your webinar title, description, and host details.
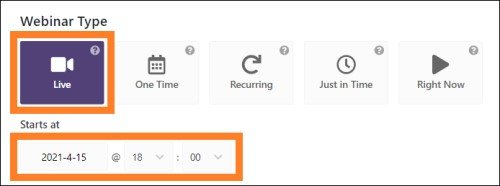
B. Choose your webinar type. We want to decide exactly when our webinar will start, so we'll select "Live". "Live" will be the only option available if you're using the free/lite version of WebinarPress.
C. Select the date and time when you want your webinar will start broadcasting (we'll set it to 2 hours from now). Though we can set the date and time when our webinar will start, with a "Live" type webinar, we'll be able to start/stop broadcasting our webinar whenever we want.
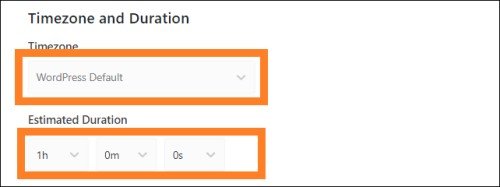
D. Set your timezone (we'll leave the timezone value as default -- WordPress default). Also set the estimated duration of your webinar (e.g. 1 hour).
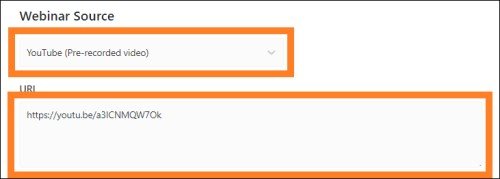
E. Select your webinar source. As we stated above, we'll broadcast a pre-recorded Youtube video, so we'll select the "YouTube (Pre-recorded video)" as our webinar source. For the URL, we'll try to broadcast this sample video -- Wildlife Windows 7 Sample Video (https://youtu.be/a3ICNMQW7Ok).
3. Click the Save & Publish button above to save your new webinar.
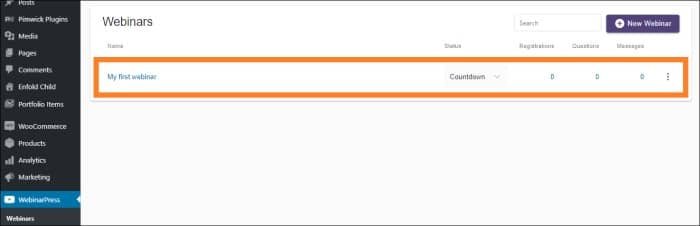
Now when you go to your Webinars list (WebinarPress > Webinars), you should see your newly created webinar. 👏
The webinar that we've just created will start automatically later after 2 hours (that's based on the date and time that we set), which also explains why its current status is "Countdown".
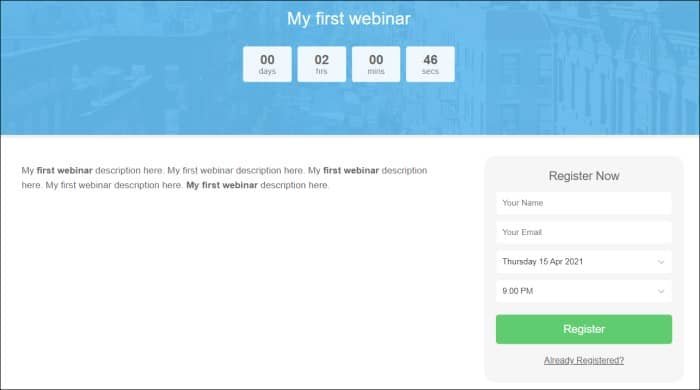
In case your attendees go to your webinar earlier than the date and time ("Starts at") that you set, what they will see is the countdown of your webinar.
Later we'll talk about how you can customize your webinar countdown page.
How to Broadcast your Live Webinar in WebinarPress?
As we said, the webinar that we've just created will start automatically in couple of hours. But for us to see right now what the webinar looks like when broadcasting on both the attendee and host point-of-view, we'll start to broadcast now.
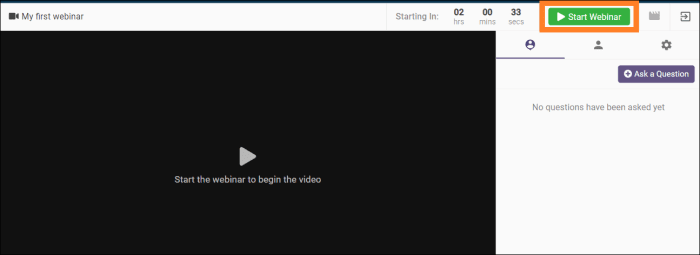
From the Webinars list page (WebinarPress > Webinars), access your webinar room.

Click the Start Webinar button to start broadcasting your webinar.
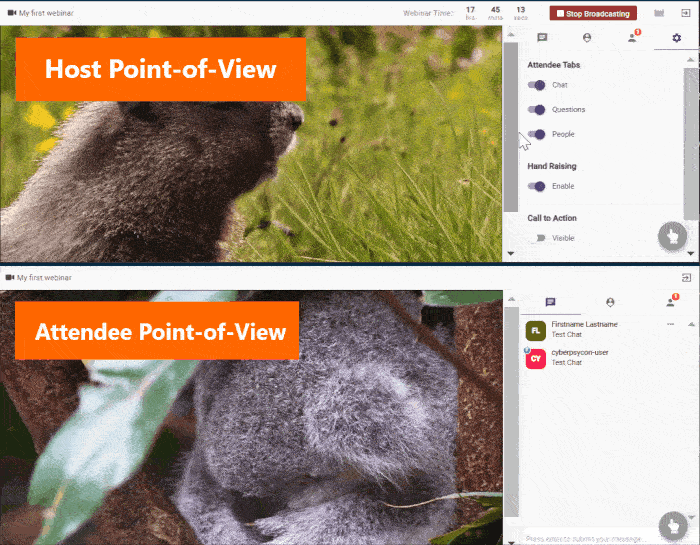
Broadcasting YouTube pre-recorded video in WebinarPress (attendee point-of-view).
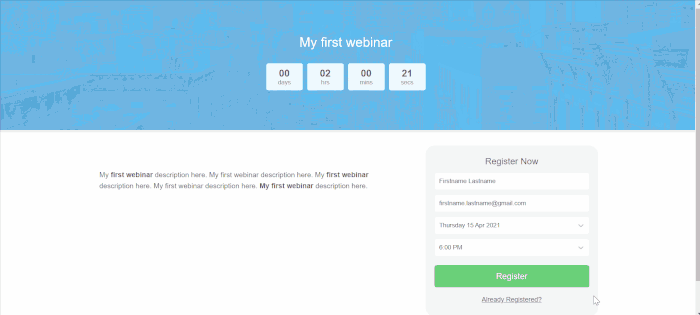
As an attendee, you'll need to register first before you can join a webinar. Upon registration, you'll be redirected to a Confirmation page (you'll see details here such's the webinar title, scheduled date and time, and webinar link). If you click the Join Webinar button or the webinar link, you'll be redirected to the actual webinar page.
From the webinar page, you'll be able to watch the webinar video (you can watch it in fullscreen mode by clicking the fullscreen icon at the bottom left of your screen), interact with others -- send message to other attendees within the chat tab, ask question/s to webinar host within the question tab, and see who's watching with you within the attendee's tab.
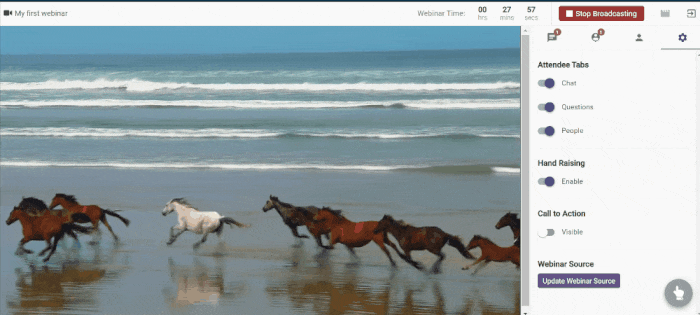
Broadcasting YouTube pre-recorded video in WebinarPress (host point-of-view).
As a webinar host, you're the one who's responsible for moderating your webinar chat and answering your attendee's questions.
From the webinar page, you'll be able to change the settings of your webinar in real-time (enable/disable webinar chat tab, questions tab, attendees tab, hand raising, etc.). 😎
How to Customize your Pages in WebinarPress?
Customize your Registration Page
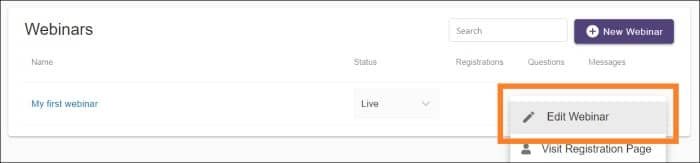
1. To customize your Registration page, go to the Webinars list page first, then edit your webinar.
2. Next, under the Design section, select the Registration tab, then click the Launch Visual Editor button. You'll see all available design settings (as tabs) here and also the preview of the current design of your Registration page.
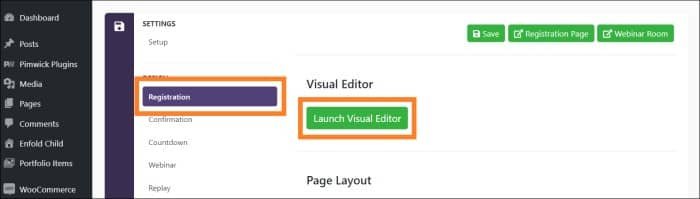
3. Perform the hands-on designing and style customization of your Registration page.
As you can see, we have 7 tabs available here: Header, Countdown Timer, Video & Description, Registration Form, GDPR Optin, Footer, and Custom CSS. Under each tab (except Custom CSS), you'll be able to play around with the design and style of every element within your Registration page.
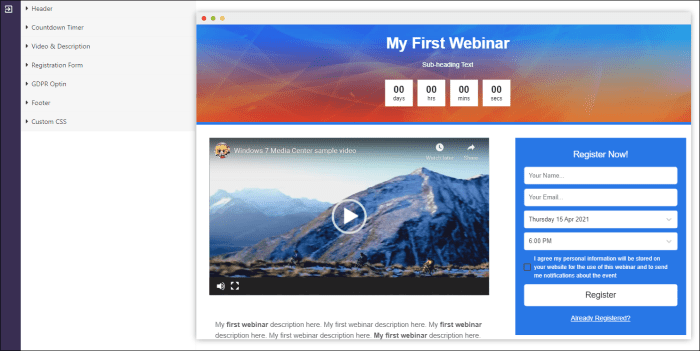
Big thumbs up to WebinarPress real-time page editor/customizer -- with this you'll be able to see the changes to your page design and style in real-time. We're actually pretty surprised after we found out that this feature is also available in lite/free version of WebinarPress. 👏
Tips:
-
- Under the Video & Description tab, you can take advantage of the add video/image material feature -- grab the attention of your potential attendees by adding a preview (maybe a short video clip or a featured image) that is related to your upcoming webinar.
- If you want to change the style of a specific element within your page but there's no available design option, you can add your own CSS code under the Custom CSS tab.
4. Once you're finished, click the exit icon (at the top-left corner of your screen), then click Save button to save your changes.
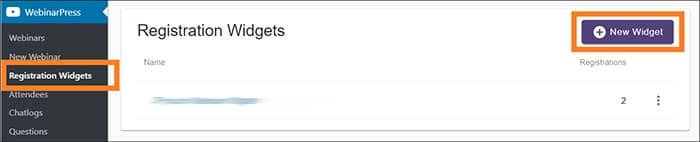
WebinarPress Registration Widgets
WebinarPress allows you to use a custom Registration page if you don't want to use their default one.
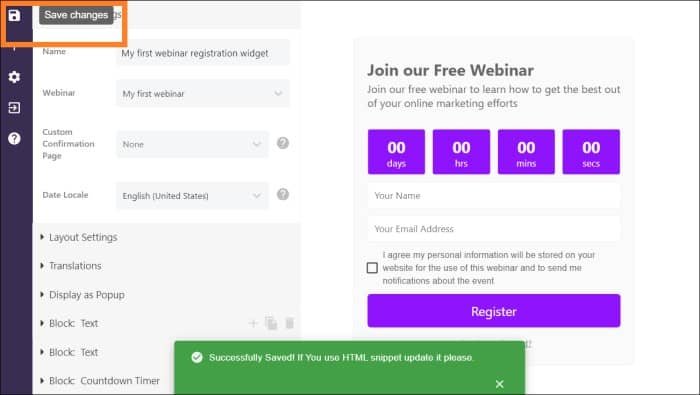
1. First, create your Registration widget.
Navigate to WebinarPress Registration Widget, then click the New Widget button.
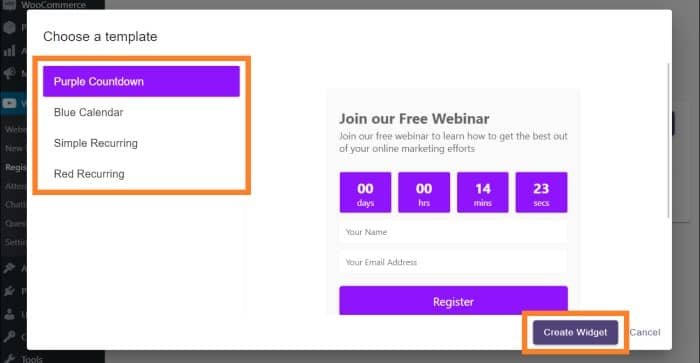
2. Next, choose a template for your Registration widget and click the Create Widget button.
3. Then, click the save icon (at the top-left corner of your screen) to save your changes.
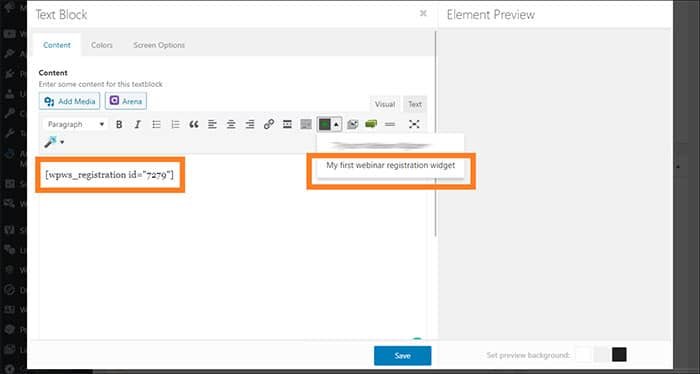
4. After that, edit one of your pages and insert your Registration widget shortcode.
You should be able to insert your Registration widget shortcode easily using WordPress WYSIWYG editor.
5. Finally, save your page.
Your Registration widget should appear now on your custom Registration page. 🤘
Customize your Webinar Page
1. To customize your Webinar page, go to the Webinars list page first, then edit your webinar.
2. Still, under the Design section, select Webinar tab, then click the Launch Visual Editor button. You'll see that we only have 3 tabs available here: Setup, Call to Action, and Custom CSS.
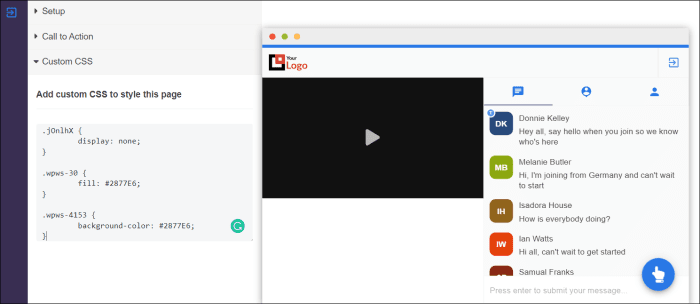
3. Under the Setup tab, you will be able to personalize your Webinar page by uploading your own company/brand logo. You'll also have the option to enable or disable Questions, Attendee Chat, Attendee List, and Hand Raising by default.
Note: Even if your webinar's running or broadcasting live, you'll still be able to show or hide Questions, Attendee Chat, etc. whenever you want. This's helpful if you want to control when only your attendee will be able to interact with others (within the chat tab), with you (within the questions tab), etc.
Now that you have the basic idea of how WebinarPress real-time page editor/customizer works, we think you'll be able to handle the design and style customization for your remaining pages: Confirmation page, Countdown page, and Replay page. 😉
WebinarPress Advanced Settings
Most of the features here under Advanced settings are only available in the Pro version of WebinarPress.
Access Control Settings (Pro)
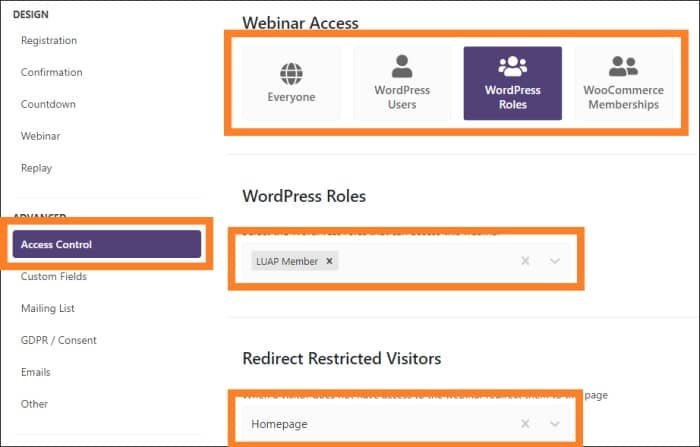
With this feature, you'll be able to decide who can only access your webinar.
Everyone. Literally, anyone with your link will be able to access your webinar page.
WordPress Users. Here you can manually select specific users (users that are already registered on your WordPress site).
WordPress Roles. Here you'll be able to select a specific WordPress role. If you're using a membership plugin, all the custom user roles that you've created will be available here from the dropdown select field. We'll choose this option since we're using a free membership plugin -- Simple Membership.
WooCommerce Memberships. Select this one if you're using the WooCommerce Memberships plugin (a paid membership solution plugin).
Custom Fields (Pro)
Under this tab, you'll be able to add custom fields to your registration form.
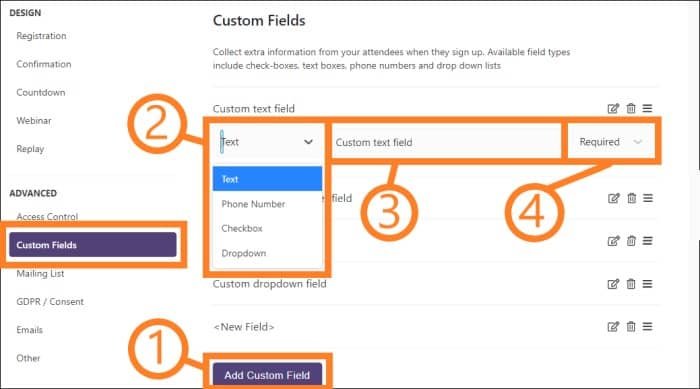
1. First, click the Add Custom Field button.
2. Next, select your field type (your custom field can be a Text, Phone Number, Checkbox, or Dropdown).
3. Then, provide the name of your custom field.
4. After that, choose whether your custom field should be Required or Optional.
5. Lastly, click the Save button above to save your changes.
Your custom field/s should appear now on your (default and/or custom) Registration page. 🤘
Mailing List (Pro)
With this feature, you'll be able to integrate to the web's most popular mailing list services such's Mailchimp, GetResponse, ActiveCampaign, etc.
For this demo, we'll try to integrate MailChimp (one of the most popular email marketing services) into WebinarPress.
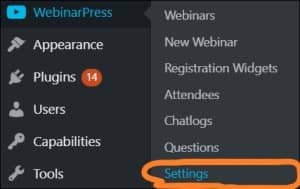
1. From left sidebar of your WordPress dashboard, hover your mouse cursor to WebinarPress and click Settings.
2. Under Settings, select the Mailing Lists tab (here you'll see all available mailing list services available).
3. Get your API key (MailChimp API Key in our case) and paste it to the respective mailing list service API Key field.
4. Check if WebinarPress can connect to your mailing list service by clicking the Check button (success message will be shown when the test connection is successful).
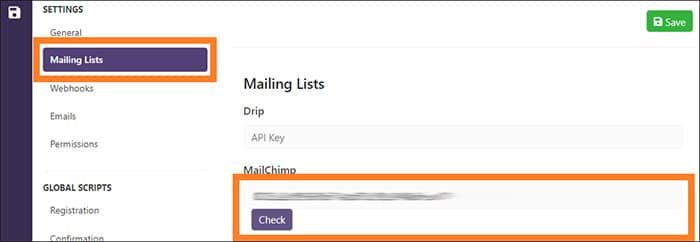
5. Click the Save button above to save your changes.
6. Now go to the Webinars list page (WebinarPress > Webinars), then edit your webinar.
7. Under the Advanced section, select the Mailing List tab.
8. Next, select your Mailing list service (we'll select MailChimp here) and also the list where you want to sync your attendee.
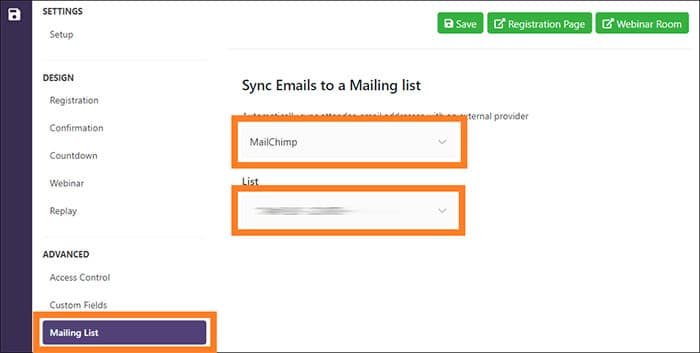
9. Finally, click the Save button above to save your changes.
Now, when someone's register to your webinar, their data will be synchronized automatically to your mailing list service. 👍
Related: Add Mailchimp form to your WordPress site.
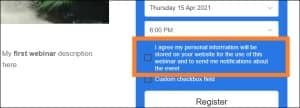
GDPR/Consent (Free & Pro)
Under this tab, you'll be able to customize your GDPR/Consent message. This feature is also available in the free/lite version of WebinarPress.
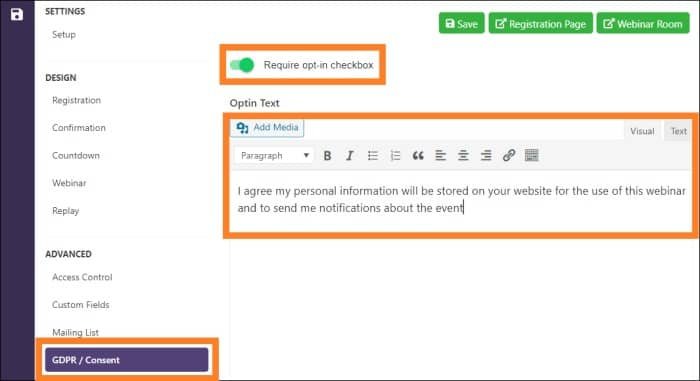
1. First, enable the Require opt-in checkbox.
2. Then, write your own GDPR/Consent message -- claim to your visitors that you are holding and processing their data.
3. Click the Save button above to save your changes.
Now your GDPR/Consent check box should appear now within your Registration form. 👏
Emails (Pro)
With this feature, you'll be able to set your email sender (email from name and address) for your specific webinar.
Note: Only change the settings here if you don't want to use the email sender that is already set globally from Emails global settings here.
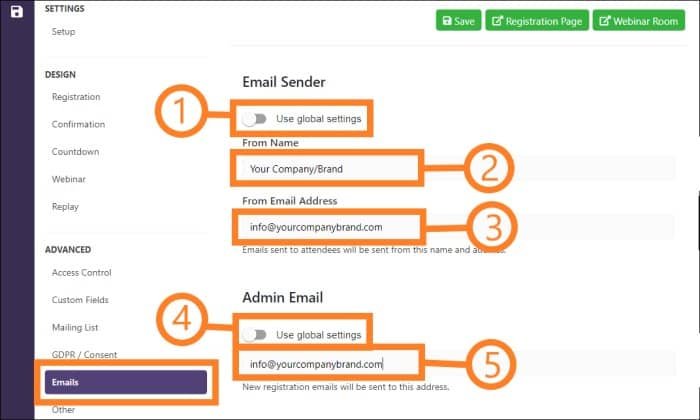
1. Disable Use global settings for Email Sender.
2. Provide your "From Name" (this can be your company/brand name).
3. Provide your "From Email Address" (this can be your company/brand email address).
4. Disable Use global settings for Admin Email.
5. Provide your admin email address (new registration emails will be sent to this address).
Other (Pro)
Under this tab, you'll be able to customize other options for your webinar.
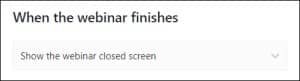
1. When the webinar finishes. Choose whether you want to show the webinar closed screen or redirect your attendee to a specific URL when your webinar finishes.
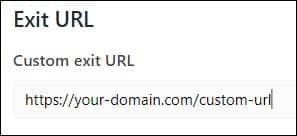
2. Exit URL. Specify your custom exit URL. Your attendees will be redirected to this URL when they exited from your webinar.
3. Automatic Registration.
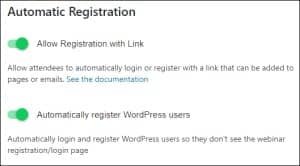
Allow Registration with Link - enable this to allow your attendees to automatically register or login to your webinar with a link -- that can be placed on your website or in your email. If your attendees clicked your auto-registration link, they'll be registered automatically to your webinar -- there's no need for them to manually register (manually enter their name and email).
Here's a sample code of an anchor tag with the auto-registration link that you can place on your website or in your email (of course the attendee_name and attendee_email value should be dynamic).
<a href="https://yourdomain.com/webinars/my-first-webinar?auto_register=1&attendee_name=John Doe&attendee_email=john.doe@gmail.com">This's an auto-registration link.</a>Automatically register WordPress users - enable this if you already have existing users on your WordPress site -- so they don't see the webinar registration/login page.
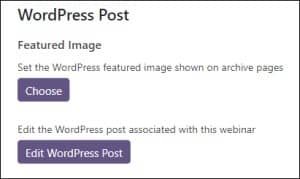
WordPress Post. We can say the best way to customize your webinar page is through the use of real-time page editor/customizer. But if you want to set up your SEO -- SEO title, metadata, keyword/s (using an SEO plugin such's Yoast SEO), yes you can edit this WordPress post that's associated with your webinar. Note that you only want to do this if you're letting crawlers (such's Google bot) index your webinar page.
Just click the Edit WordPress Post button (you'll be redirected to your Webinar WordPress post).
How to Customize your Email Templates in WebinarPress?
By default, all your webinars email templates (New Registration, Confirmation, One Day Before, etc.) refer to the WebinarPress global email templates settings.
For this demo, we'll try to customize our New Registration global email template. Good news for us, the lite/free version of WebinarPress allows us to customize all of our email templates.
1. Navigate to WebinarPress settings, hover your mouse cursor to WebinarPress and click Settings.
2. Under Email Templates, select the New Registration tab (here you'll see the email Subject and Content fields).
3. Customize your email Subject and Content fields. Here you'll be able to add/insert WebinarPress shortcode/s: [attendee-name], [attendee-email], [webinar-title], [webinar-link], [webinar-link-button text="Join our webinar"], [webinar-date], [webinar-time], [webinar-timezone].
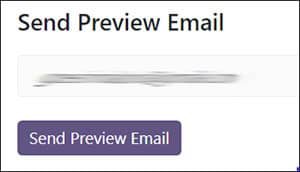
4. Send a preview email so you'll see first how your New Registration email will look like.
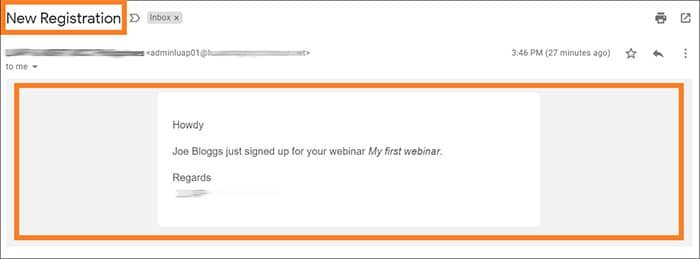
Here's the actual New Registration email we've received.
The steps above are also applicable when you're customizing other email templates such's Confirmation, One Day Before, One Hour Before, etc. 😊
Note: If you don't want to use WebinarPress global email template settings for your specific webinar, then edit that specific webinar of yours. Under Email Templates select the email tab that you want to edit (e.g. New Registration), then disable the Use global settings option. Now you should be able to customize your own email subject and content for your specific webinar.
How to Import/Export your WebinarPress Settings?
The Import/Export settings are only available in the Pro version of WebinarPress.
This feature will be helpful if you want to mirror one of your previously created webinars to your new webinar (it'll really save your time and energy).
Steps to export your WebinarPress settings.
1. To export your specific webinar settings, go to the Webinars list page first, then edit your webinar.
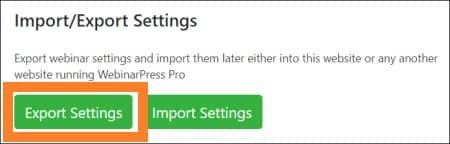
2. Next, under the Export section, select Import/Export tab (you'll see 2 buttons here -- Export Settings and Import Settings).
3. Click the Export Settings button to export your webinar settings. All the settings of the webinar that you've selected will be stored on a JSON file and will be downloaded automatically from your browser.
Steps to import your WebinarPress settings.
1. First, create a new webinar.
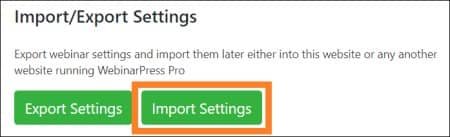
2. Next, edit your newly created webinar, under the Export section, select Import/Export tab (again you'll see 2 buttons here -- Export Settings and Import Settings).
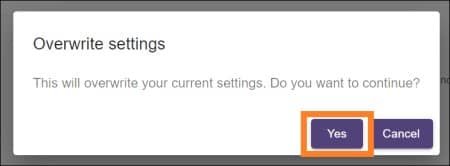
3. Then, click the Import Settings button (you'll be prompted to locate your JSON file). Locate and select your JSON file (you'll see this Overwrite settings prompt message, just click "Yes" to continue).
4. Lastly, click the Save button above to save your changes.
Now the settings of your new webinar will be exactly the same as the settings of your previously created webinar. 😎
How to Export your Attendees, Chat Logs, and Questions in WebinarPress
The export attendees, chat logs, and questions feature are only available in the Pro version of WebinarPress.
This feature will simply help you better understand your audience -- how they interacted with your webinar -- through their messages/comments (in chat tab) and questions (in questions tab).
All your exported data may help you answer the questions such's "How your webinar goes?", "What worked?", "What didn't worked?", and "What you can improve?".
Export Attendees
Steps to export your attendee's details to CSV (or BCC file).
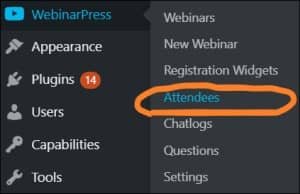
1. Navigate to Webinar Attendees, hover your mouse cursor to WebinarPress, and click Attendees.
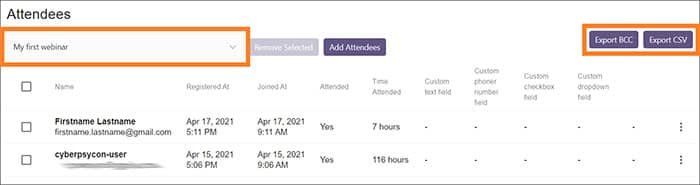
2. Select your webinar from the dropdown select (you'll see all your registrant's details including the custom field/s).
Now click the Export CSV button (all your registrant's details will be stored on a CSV file and will be downloaded automatically from your browser).
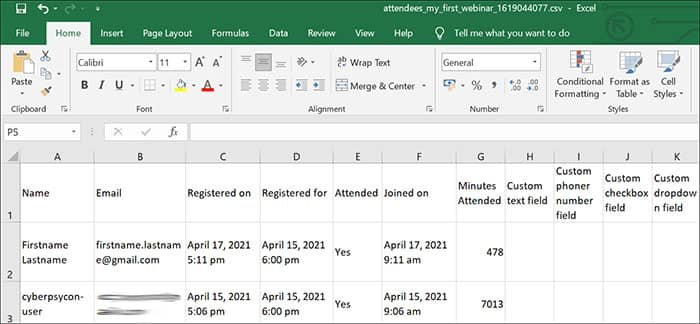
3. Open your attendee's CSV file for checking.
Export Chat Logs
Steps to export your chat logs to CSV file.
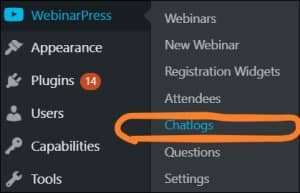
1. Navigate to Webinar Chat Logs, hover your mouse cursor to WebinarPress and click Chat Logs.
2. Select your webinar from the dropdown select (you'll see all your attendee's chats).
Click the Export CSV button (all your attendee's chats will be stored on a CSV file and will be downloaded automatically from your browser).
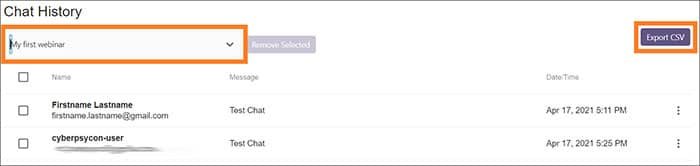
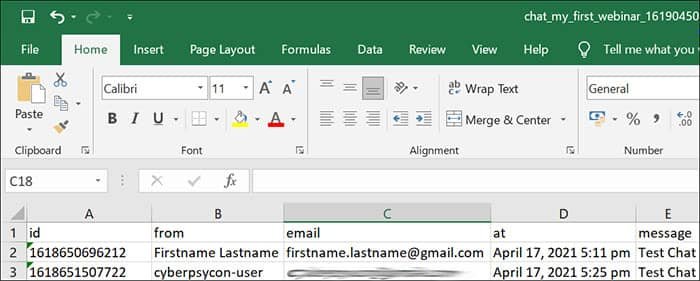
3. Open your chat logs CSV file for analysis.
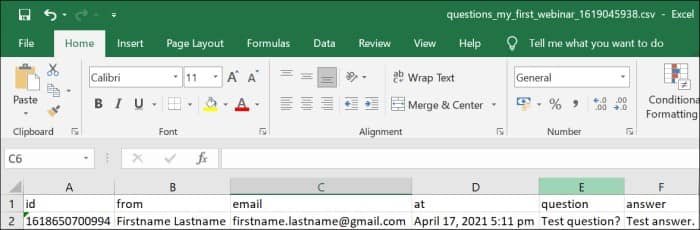
Export Questions
Steps to export your questions to CSV file.
1. Navigate to Webinar Questions, hover your mouse cursor to WebinarPress and click Questions.

2. Select your webinar from the dropdown select (you'll see all your attendee's questions and also your webinar host/s answers).
Now click the Export CSV button (all your attendee's questions and your webinar host/s answers will be stored on a CSV file and will be downloaded automatically from your browser).
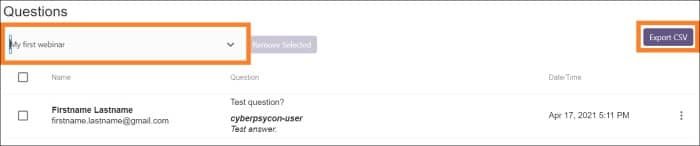
3. Open your questions CSV file for analysis.
Is WebinarPress Really Worth your $197/year?
"Is WebinarPress really worth your $197/year?" question is quite subjective. But our short answer to this question is ... "Yes" and here's our criteria:
1. Did you get positive feedback or a good rating from your webinar attendees? If yes, then you know the answer -- it's worth it; not just the dime you spend to purchase this webinar plugin but also the time and energy you've invested to make your virtual event happen.
If you haven't yet created event feedback or survey questions for your virtual event, you better create one now. Add meaningful questions into it -- ask your attendees "What did you like most about our event?", "What did you like least about our event?", "On a scale of 1 to 5 (1 is the lowest and 5 is the highest) how would you rate our event?". Now that you have the email list of your webinar attendees, you're just one step away from connecting with them -- send them a friendly email and ask them for their feedback. 😉
2. Have you built your new email list? The answer is obvious. If you gathered hundreds (or even thousands) of emails from your webinar, then we can say it's really worth it. Remember that building an email list is like building a relationship with your potential customers.
3. Did you earn money from your webinar? If you hosted a paid webinar and earned profit from it, then congrats! Purchasing this webinar plugin is more than worth it for you.
4. Above all, we can say buying this webinar plugin's worth it: If you've shared well your ideas, thoughts, and value with people (created a positive impact on them); If you've connected with them, if you get your attendees to interact with each other and with you (have meaningful conversations with them); Lastly, if you and your attendees really enjoyed the webinar, then that's one of a kind level of success.
How to Upgrade your WebinarPress to Pro?
Purchase WebinarPress Pro Version
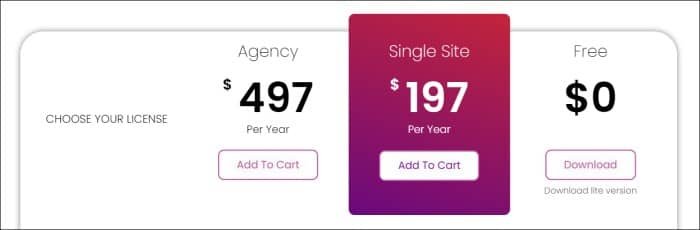
1. Go to WebinarPress official website here.
2. Scroll down to "Plans" section, then Choose your license and click the Add To Cart button (you'll be redirected to the Checkout page).
3. Proceed to payment.
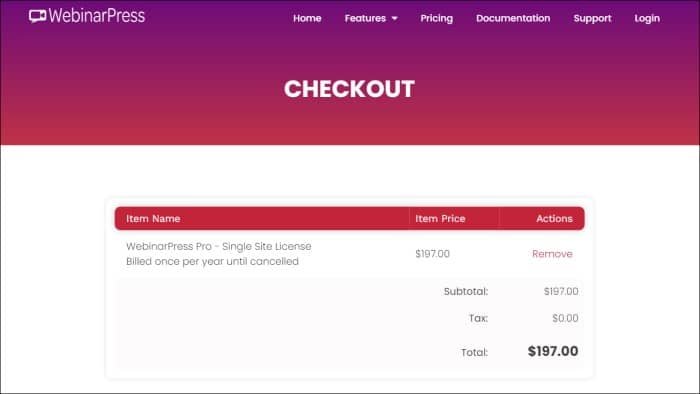
Select your payment method (select between Paypal and Credit Card).
Provide your personal info, credit card info (if you selected Credit Card as your payment method), and billing details.
Check "I agree to the license terms and refund policy" and click the Purchase button.
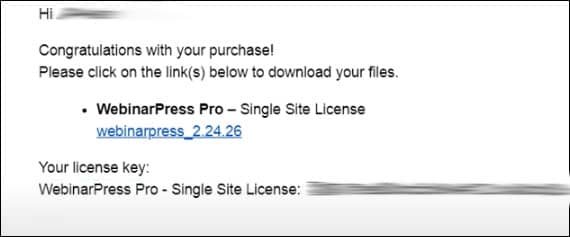
Right after your purchase, you will receive an email from WebinarPress that contains your purchase receipt details -- this includes the link to the WebinarPress Pro version download file, your license key, and your invoice details.
Activate your WebinarPress License Key
1. Download the WebinarPress Pro version zip file.
Again, the link to WebinarPress Pro version download file is in the purchase receipt email sent to you by WebinarPress.
If somehow you can't find their email, log in to your WebinarPress account here, then go to My Dashboard page (you should see the details of your purchases).
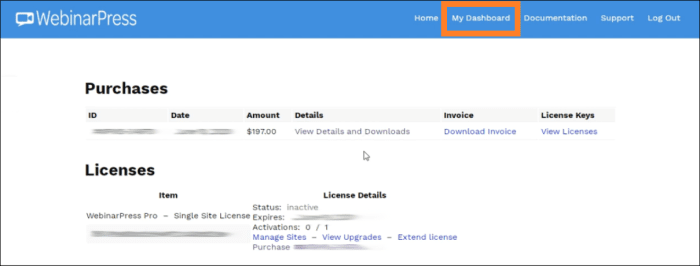
Click the View Details and Downloads link and download the WebinarPress Pro zip file.
2. Install and activate the WebinarPress Pro version.
Note: If you have installed and activated the free/lite version of the WebinarPress on your WordPress site, then you should deactivate (and delete) it first.
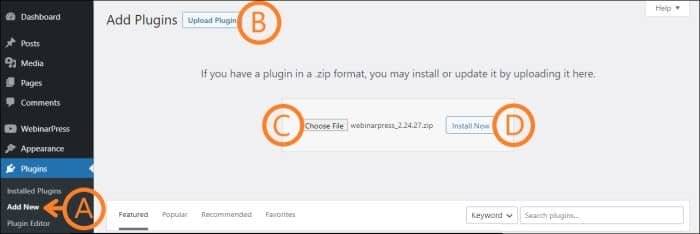
A. Again, from left sidebar of your WordPress dashboard, hover your mouse cursor to Plugins and click Add New.
B. Click the Upload Plugin button.
C. Click the Choose File button then locate and select your WebinarPress zip file.
D. Activate the plugin after installation.
Again, the WebinarPress tab should be visible now from your WordPress dashboard sidebar.
3. Activate your WebinarPress License Key
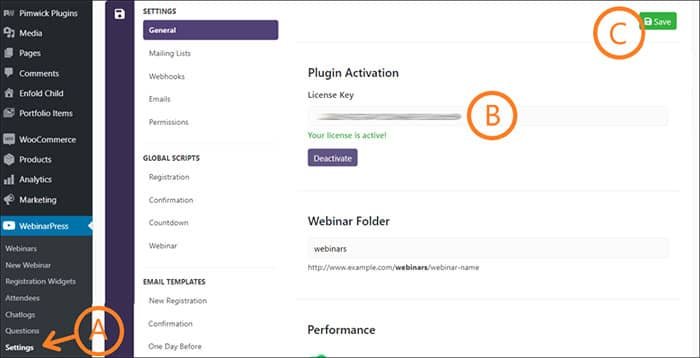
A. From left sidebar of your WordPress dashboard, hover your mouse cursor to WebinarPress and click Settings.
B. Copy and paste your license key to the License Key field.
Again, your WebinarPress Pro license key is in the purchase receipt email sent to you by WebinarPress.
If somehow you can't find their email, then go to your WebinarPress dashboard page (you should see your license key under the Licenses section).
C. Click the Save button to save your changes.
Your WebinarPress Pro license key should now be activated. 👏
Leave a Reply
You have any questions or suggestions? Experiencing technical issues?
Please drop a comment, we're willing to resolve any issues and improve our solutions. Let's have a personal and meaningful conversation. 😀