

Last updated on March 9th, 2023
Integrate Paynamics Payment Gateway with WooCommerce Tutorial
Here in this tutorial, we'll share with you how you can integrate Paynamics with your WooCommerce website.
Before we jump into steps, let's have a little bit of introduction to Paynamics. Paynamics is one of the most trusted and accessible payment providers here in the Philippines. They are widely known for providing online service that facilitates payment transactions between a merchant (majority SMEs) and a customer.
Paynamics Major Features:
- Allows you to accept payments anywhere in the world - boasting 32,000+ Cash in Centers and connected to over 50+ local banks.
- Low transaction cost - they offer lower fees compared to other Philippine-based payment gateway providers out there.
- Easy integration - they have developed APIs and integration kits for platforms such's WordPress, Shopify, and many more.
- Other features: recurring payments, web terminal, email billing, shopping cart plugins, real-time reporting, etc.
Paynamics Payment Channels:
- Mobile payment apps/E-wallets: Gcash, Paymaya, Grabpay, Alipay, WeChat, etc.
- Over-the-counter channels: Cebuana Lhuillier, M Lhullier, SM, ECPAY, CLiQQ, etc.
- Credit Card/Debit Card: Visa, Mastercard, American Express, JCB, BancNet, etc.
- Bank: BPI, BDO, Union Bank, Security Bank, UCPB, RCBC, etc.
Note: You should already have installed WooCommerce plugin on your WordPress site before you can perform the following steps.
Summary
Install and activate WooCommerce Paynamics Payment Gateway plugin
Fill up your Paynamics merchant form
Configure Paynamics Payment Gateway settings as sandbox mode
Configure Paynamics Payment Gateway settings as live/production mode
Paynamics Payment Gateway (PayGate) portal
Sign up with Paynamics
Before you can sign up with Paynamics, you have to inquire first with their payment experts. Let them know about your business -- tell them your requirements, inform them that you're using WordPress, and ask them all your questions.
To inquire with Paynamics, go to the Paynamics contact page here and fill-up the form. In the message field you may want to include the following:
- Question: "How much is the charge for the one-time set up for my merchant account?" (so you'll know right away how much you'll pay).
- Also ask them if they can give you a list of payment methods they support and their equivalent fees.
- Lastly, let them know when you're available for a call.
After your call with Paynamics team, when you agree with their contract and settle your payment, they will start setting up your merchant account. After that, they will send you the integration kit and all the materials you need.
Paynamics will give you the following:

1. woocommerce-paynamics.zip file - an integration kit or simply a WordPress plugin for WooCommerce Paynamics integration.
2. Test merchant credentials - details you'll use to set up your sandbox for your test payments.
3. Test payment accounts - test Credit Card/Debit Card accounts, E-wallet accounts, etc. you'll use for your test payment.
4. Paynamics Paygate RPF - a document that contains vital info about the kit (software requirements, required settings, version history, etc.).
Once you have the integration kit and all the materials above, you can start to integrate Paynamics to your website and conduct a test payment.
Important Notes:
- Paynamics team will send you a "merchant form" document. Here you'll provide your personal and business info and also some technical details of your website. We'll set up the plugin first before we fill up this document.
- You have to send your test payment result to Paynamics team before they can give you your "live merchant credentials".
Let's get started!
Install & Activate WooCommerce Paynamics Payment Gateway Plugin
1. First, extract your "woocommerce-paynamics.zip" file (you'll get two files here -- "payment_notification.php" and "woocommerce-paynamics.zip"). If you get "woocommerce-paynamics" folder instead of "woocommerce-paynamics.zip", simply compress the folder using Winzip or 7 ZIP app.

Place the "payment_notification.php" inside your WordPress project root folder. This file is where the PAYGATE will POST base64 encoded XML notification update for their transaction or its final status.

2. Next, sign in to your WordPress site.
3. From left sidebar of your WordPress dashboard, hover your mouse cursor to Plugins and click Add New.

4. Click the Upload Plugin button, tap Choose File and locate/select your "woocommerce-paynamics.zip".
5. After that, hit the Install Now button.
6. Lastly, activate the plugin after installation.
Paynamics Payment Gateway should be added now as one of your payment methods. 🤘
Fill up your Paynamics Merchant Form
Here's the merchant document (in google sheet) shared with us by the Paynamics team.
![]()
1. Response URL - the page where your customer will be redirected after successful payment.
2. Notification URL - this's your "payment_notification.php" location. Remember that we placed our "payment_notification.php" inside our WordPress project's root folder, so our Notification URL will be https://our-domain.com/payment_notification.php.
3. Cancel URL - the page where your customer will be redirected when they cancel their payment.
4. IP Address - this's your web host IP address.
5. Merchant logo - the link/URL to your company/brand logo.
Once you're done filling up the merchant form, inform Paynamics team so they will be able to whitelist your IPs and URLs.
While waiting for Paynamics to whitelist your IPs and URLs, you can start now configuring your Paynamics Payment Gateway as sandbox mode.
Configure Paynamics Payment Gateway Settings (Sandbox Mode)
1. Navigate to WooCommerce settings, hover your mouse cursor to WooCommerce and click Settings.

2. Select the Payments tab and click the Manage button next to Paynamics Payment Gateway.

3. Configure your Paynamics Payment Gateway Settings as sandbox mode.

A. Enable sandbox for you to be able to test payments using your test accounts.
B. Set your IP Address (again this's your web host IP address).
C. Set the Notification Receiver URL (as we stated above, this's your "payment_notification.php" location).
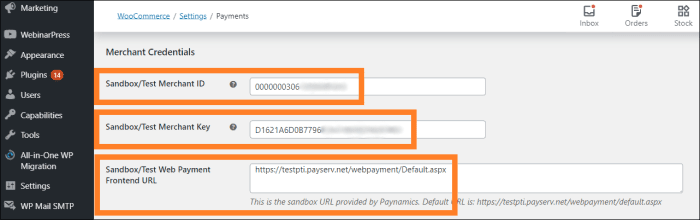
D. Provide your Sandbox/Test Merchant ID, Sandbox/Test Merchant Key, and Sandbox/Test Web Payment Frontend URL. Refer to the test merchant credentials document given to you by Paynamics team.
E. Click the Save Changes button.
Now you should be able to conduct test payment on your WordPress site. 👏
Conduct a Test Payment (Sandbox Mode)
For this demo, we'll try to purchase an "Event Pass" (WooCommerce product) on our WordPress site with Gcash (test account) through Paynamics.
Refer to the test payment accounts document given to you by Paynamics team. The test payment accounts document will contain test Credit Card/Debit Card accounts, E-wallet accounts, etc.
Here's the result of our test payment.

As we stated above, you have to send your test payment result to Paynamics team before they can give you your "live merchant credentials". After they verified that your test payment's successful, they will give you your "live merchant credentials" right away.
Once you have your "live merchant credentials", you can start to configure your Paynamics Payment Gateway settings as live/production mode. 🤘
Configure Paynamics Payment Gateway Settings (Live/Production Mode)
1. Go back to your Paynamics Payment Gateway settings (WooCommerce > Settings > Payments tab > Paynamics Payment Gateway).
2. Configure your Paynamics Payment Gateway Settings as live/production mode.
A. Disable sandbox for you to be able to test payments using your real accounts.

B. Provide your Live Merchant ID, Live Merchant Key, and Live Web Payment Frontend URL. Refer to the "live merchant credentials" document given to you by Paynamics team.

3. Hit the Save Changes button.
Now you should be able to purchase WooCommerce products on your website using your real accounts through Paynamics. 👏
Paynamics Payment Gateway (PayGate) Portal
Paynamics Payment Gateway portal allows you to view your transactions table and reports. We primarily use this portal to cross-check payment transactions between WooCommerce and Paynamics.
Log in to your Paynamics PayGate portal. Refer to the "live merchant credentials" document given to you by Paynamics team.

Useful tips:
- Cross-check payment transactions between WooCommerce and Paynamics - to cross-check specific WooCommerce orders here, get your WooCommerce order number first, next, input the number to the "Request ID" field, then click the Filter button.
- Use the "Payment Type" dropdown field to filter transactions by payment type such's Credit Card, Paypal, Gcash, 7eleven, etc.
- Use the "Timestamp" date and time field to filter payment transactions by date and time range (date-time "from" and "to").
- From the transactions table, you'll be able to see vital transaction details such's timestamp, account holder, amount, payment type, response, request ID (this's equivalent to your WooCommerce order number), etc.
Related: Integrate DragonPay online payment platform with your WooCommerce website
Final Words
At the end of this tutorial, you should be successfully integrated Paynamics with your WooCommerce website.
Here's the summary of the steps we have performed above:
1. Sign up with Paynamics - inquire with their payment experts and settle your payment. After that, your merchant account will be set up and you will receive all the materials you need (including the integration kit for WordPress).
2. Install and activate the WooCommerce Paynamics Payment Gateway plugin on your WordPress site. This will add the Paynamics Payment Gateway as one of your payment methods.
3. Fill up the Paynamics "merchant form" given to you; inform Paynamics team once you're done filling it up so they will be able to whitelist your IPs and URLs.
4. Configure your Paynamics Payment Gateway Settings as sandbox mode for you to be able to conduct test payment on your WooCommerce website.
5. After conducting test payments, send the result to Paynamics team so they can give you your "live merchant credentials".
6. Lastly, configure your Paynamics Payment Gateway Settings as live/production mode (refer to the "live merchant credentials" given to you). Now your customers should be able to purchase products from your WooCommerce website through Paynamics.
Remember: You can always use Paynamics Paynamics Gateway (PayGate) portal to view your transactions table and reports.
That's all for now fellas.
Do you have any questions or clarifications regarding the Paynamics and WooCommerce integration? Did you encounter any difficulties while following our tutorial? Let us know in the comments below! 😊
Leave a Reply
You have any questions or suggestions? Experiencing technical issues?
Please drop a comment, we're willing to resolve any issues and improve our solutions. Let's have a personal and meaningful conversation. 😀