

Laravel Text to Speech Offline with Web Speech API Speech Synthesis
Last updated on February 19th, 2021
Searching for text-to-speech (TTS) solution (such as ResponsiveVoice JS, Cloud text-to-speech, or Web Speech API speech synthesis) for your project?
Blog sites today starting to convert their written content into a lifelike human voice using some text-to-speech reader. They've added an option for a reader to play an audio voice instead of reading text-based content. It's simply like creating an audiobook version for each and every published content they have.
You'll also notice that business websites nowadays already have interactive voice response. They respond in voice form for certain transactions you do. They'll greet you (with a natural-sounding speech) when you signed in to their site. They'll say "thank you" after you bought some product/s. What a great way to engage with customers and visitors right?
Above were just a few of the numerous ideas you can do when you enable voice on your site.
Adding TTS functionality to a system connected to the internet is easy. What's challenging is implementing TTS solution in offline systems (not connected to the internet). In this research, we'll share with you the knowledge on how to add offline text-to-speech functionality to your Laravel app. Maybe you're not using Laravel framework? Don't worry, regardless of the PHP framework you're using (or even if you're not using any framework at all) you can still come up with this tutorial.
We'll recommend to you some text-to-speech plugins we think are the best among all other text-to-speech plugins out there.
We'll use Web Speech API speech synthesis to implement offline text-to-speech on a web project. Haven't heard of it? That's OK, ... we're aware that Google text-to-speech service (Cloud text-to-speech) always 10x more popular compare to any other speech synthesis out there. We either haven't heard of Web Speech API speech synthesis before. But here we are going to walk you through using Web Speech API speech synthesis.
Summary
Text-to-Speech Solutions Similar to Web Speech API Speech Synthesis
Introduction to Web Speech API Speech Synthesis
Steps to Integrate Web Speech API Speech Synthesis in Laravel
Common Issues When Using Web Speech API Speech Synthesis
What We Have Learned About Web Speech API Speech Synthesis
Text-to-Speech Solutions Similar to Web Speech API Speech Synthesis
ResponsiveVoice JS
So, how do we know about ResponsiveVoice JS?
One of our previous projects is a queue management system. Instead of building the project from scratch, we searched the internet for a web-based queuing system (a bare minimum one) we can buy and modify. We found JL Token - Queue Management System developed by Justlab. We bought that project and found out it uses ResponsiveVoice JS for text-to-speech functionality. The project uses the plugin for calling tickets with natural human voice.
ResponsiveVoice JS is simply a text-to-speech library built to add a voice feature to your website. You provide your text, you let the plugin read out loud your text. Yeah, you've read that right, this plugin speaks for your visitors. It uses HTML5 text-to-speech API technology to read your HTML webpages. With this library, you can add voice feature to your site in 51 languages plus you can choose from 168 voices available. Quite a lot right? Queue management systems like JL Token uses the plugin for calling tickets with a realistic human voice. Check out the quality of voice ResponsiveVoice JS produce here.
ResponsiveVoice JS major features:
- As of version 1.3.7 you can change the spoken voice you want to hear -- change voice pitch, rate, and volume. Again, it supports 51 languages with 168 voices.
- Intelligent enough to pause from reading when it detects question marks, colons, semi-colons, etc.
- It supports major browsers such as Google Chrome, Safari, Internet Explorer, Microsoft Edge, Mozilla Firefox, and Opera Mini. It does support major devices such as Windows, Linux, Android, and Apple iOS. What's amazing about this plugin is having an auto-adjust setting. Voice settings adjust automatically depending on the device and browser you're using.
To install this plugin you need first to get a unique code and add it to your website to instantly enable text-to-speech feature.
Though this plugin has lots of features to offer, we have to replace it due to some limitations. ResponsiveVoice JS requires an internet connection to operate. We can't use it since we're deploying our queue management system in a local environment (no internet).
Cloud Text-to-Speech
So how do we know about Cloud text-to-speech?
We tried using this service out of curiosity. We don't want to miss this high-fidelity speech synthesis.
As you may know, Google Cloud text-to-speech service converts text into audio data of natural human speech. It features its high-fidelity speech synthesis. What does it mean? It means they reproduce human voice with minimal distortion resulting in a very good quality sound -- almost like a real human voice.
Cloud text-to-speech's mechanism is simple. You send REST or either gRPC request, they process your request and return results. When sending a request you pass parameters: language, voice type, voice name, speed, pitch, volume, etc. Client library's available to these programming languages are C#, Go, Java, Node.JS, Python, Ruby, and PHP.
Cloud text-to-speech major features:
- Currently, it supports 180 voices across 30 plus languages.
- Has access to DeepMind's speech synthesis -- WaveNet. Familiar with Wavenet? Wavenet's tech produces human voice more naturally than other synthetic voices.
- Can convert text and Speech Synthesis Markup Language (SSML) into speech. Have heard of SSML before? SSML will let you add pauses, acronym pronunciations, numbers, etc. into audio data created by speech synthesis.
In terms of voice quality, We'd choose Cloud text-to-speech. No doubt it is way better than other synthetic speech out there available on the internet. But for you to use this service, you need to setup the following first: 1. Google Cloud Platform account. 2. Google Cloud project. 3. Billing must be enabled for your Google Cloud project.
Hope this isn't bad news for you. Cloud text-to-speech is a paid service (price is computed per million characters of processed text).
The next text-to-speech solution we will talk about will be our main topic, Web Speech API speech synthesis.
Introduction To Web Speech API Speech Synthesis
So, how do we know about Web Speech API speech synthesis?
From what we have stated above. We have to replace ResponsiveVoice JS with some TTS that can work offline. No external dependencies. No external resource required. Luckily we found Web Speech API speech synthesis.
As you may know, Web Speech API is a JavaScript API library. This plugin has two functions: 1. Voice recognition (speech-to-text) and 2. Speech synthesis (text-to-speech) (our main topic). Among all other text-to-speech solutions out there, We can say Web Speech API's the simplest. Easy to setup. Easy to use. But more than those, it satisfies one of the most important requirements we need -- it works offline.
Using the plugin you can customize the spoken voice output by passing the following parameters: volume, speech rate, pitch, voice, and language.
Since this API is under experiment, not all browsers support it. Chrome version 33 has the full support of Web Speech API speech synthesis but Safari for iOS7 has only partial support. So when you're planning to use Web Speech API speech synthesis for your web project, check first to see if your browser supports it. You can do that by validating if the webkitSpeechRecognition object exists.
if (!('webkitSpeechRecognition' in window)) {
  // your browser doesn't support this plugin
} else {
	// continue
}
That's how you do it. Now let's get our hands dirty. Let's start integrating Web Speech API speech synthesis in Laravel.
Steps to Integrate Web Speech API Speech Synthesis in Laravel
Note that we're using Windows OS with WAMPSERVER while creating this tutorial.
Step 1: Install Laravel Using Composer
Skip this step if you already have Laravel instance on your computer.
Before we integrate Web Speech API speech synthesis in Laravel, we'll install Laravel first on our server.
Install composer (we'll use this dependency management tool to easily install Laravel). You can download composer here. After installing composer open your terminal and enter composer -v command to check if you can properly execute composer. Composer version should be displayed on your terminal.
Navigate to the folder where you want to create your Laravel project.
cd /c/wamp64/www/ (your path may vary from this example, remember that we're using Windows OS with WAMPSERVER)
Now create a Laravel project using the composer create-project –prefer-dist laravel/laravel command. Composer will download Laravel's required files.
composer create-project laravel/laravel 5.8 --prefer-dist (you may change Laravel version here)
To install dependencies (as specified in your composer.lock file) just enter composer install command.
Open a browser and go to your project URL. Follow this link if your page displays Index of Laravel instead of Laravel’s welcome page. Follow steps from that page to see Laravel’s welcome page.
Step 2: Integrate Web Speech API Speech Synthesis in Laravel
Let's prepare the required files first before we integrate Web Speech API speech synthesis in Laravel.
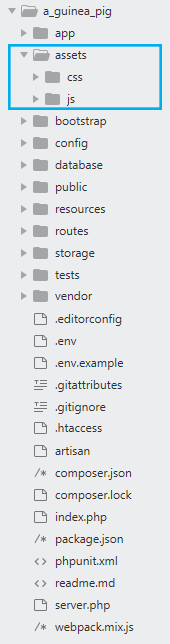
From your Laravel project's root directory, create assets folder. Inside the newly created assets folder, create js and css folder.
The file structure should look like this.
Inside of js folder create a JavaScript file web-speech-api-speech-synthesis.js. Now copy and paste the following code to the newly created js file.
var synth = window.speechSynthesis;

var inputForm = document.querySelector('form');
var inputTxt = document.querySelector('.txt');
var voiceSelect = document.querySelector('select');
var pitch = document.querySelector('#pitch');
var pitchValue = document.querySelector('.pitch-value');
var rate = document.querySelector('#rate');
var rateValue = document.querySelector('.rate-value');
var voices = [];

function populateVoiceList() {
  voices = synth.getVoices().sort(function (a, b) {
      const aname = a.name.toUpperCase(), bname = b.name.toUpperCase();
      if ( aname < bname ) return -1;
      else if ( aname == bname ) return 0;
      else return +1;
  });
  var selectedIndex = voiceSelect.selectedIndex < 0 ? 0 : voiceSelect.selectedIndex;
  voiceSelect.innerHTML = '';
  for(i = 0; i < voices.length ; i++) {
    var option = document.createElement('option');
    option.textContent = voices[i].name + ' (' + voices[i].lang + ')';
    if(voices[i].default) {
      option.textContent += ' -- DEFAULT';
    }
    option.setAttribute('data-lang', voices[i].lang);
    option.setAttribute('data-name', voices[i].name);
    voiceSelect.appendChild(option);
  }
}

populateVoiceList();

if (speechSynthesis.onvoiceschanged !== undefined) {
  speechSynthesis.onvoiceschanged = populateVoiceList;
}

function speak(msg){
  if (synth.speaking) {
      console.error('speechSynthesis.speaking');
      return;
  }
  if (inputTxt.value !== '') {
    var utterThis = new SpeechSynthesisUtterance(inputTxt.value);
    utterThis.onend = function (event) {
      console.log('SpeechSynthesisUtterance.onend');
    }
    utterThis.onerror = function (event) {
      console.error('SpeechSynthesisUtterance.onerror');
    }
    var selectedOption = voiceSelect.selectedOptions[0].getAttribute('data-name');
    for(i = 0; i < voices.length ; i++) {
      if(voices[i].name === selectedOption) {
        utterThis.voice = voices[i];
        break;
      }
    }
    utterThis.pitch = pitch.value;
    utterThis.rate = rate.value;
    synth.speak(utterThis);
  }
}

inputForm.onsubmit = function(event) {
  event.preventDefault(); // do not redirect
  speak();
  inputTxt.blur();
}

pitch.onchange = function() {
  pitchValue.textContent = pitch.value;
}

rate.onchange = function() {
  rateValue.textContent = rate.value;
}

voiceSelect.onchange = function(){
  speak();
}
Source code explanation
Line 2: Initialize Window's SpeechSynthesis object (for us to be able to use Web Speech API speech synthesis).
Line 13: Create function populateVoiceList. This function will simply populate voice dropdown select.
Line 14: Get all voices from SpeechSynthesis object and sort it out.
Line 20: Get the currently selected voice from select element.
Line 21: We prepare the select element for voices.
Line 22 - 31: Populate dropdown select element with voices from SpeechSynthesis object.
Line 34: We call populateVoiceList function.
Line 40: Create function speak. This function will convert your text input to speech based on these preferences: voice, pitch, and rate.
Line 45: We check if input text's not empty.
Line 46: We pass our text input (can also be SSML) to SpeechSynthesisUtterance (text attribute) so it'll be synthesized and spoken for the utterance.
Line 47: If Utterance has finished being spoken our text input we'll return a success message.
Line 50: Otherwise we'll return an error message.
Line 53 - 61: We set the utterance's voice, pitch, and rate.
Line 62: Let your computer speak based on your preferences.
Line 66: We call speak function on form submit.
Line 72: Update pitch's value when pitch's adjusted from range input.
Line 76: Update rate's value when rate's adjusted from range input.
Line 80: We also call speak function on the change of selected voice.
Inside of css directory create a css file web-speech-api-speech-synthesis.css. Copy and paste the following code to the newly created css file.
body, html {
  margin: 0;
}

html {
  height: 100%;
}

body {
  height: 90%;
  max-width: 800px;
  margin: 0 auto;
}

h1, p {
  font-family: sans-serif;
  text-align: center;
  padding: 20px;
}

.txt, select, form > div {
  display: block;
  margin: 0 auto;
  font-family: sans-serif;
  font-size: 16px;
  padding: 5px;
}

.txt {
  width: 80%;
}

select {
  width: 83%;
}

form > div {
  width: 81%;
}

.txt, form > div {
  margin-bottom: 10px;
  overflow: auto;
}

.clearfix {
  clear: both;
}

label {
  float: left;
  width: 10%;
  line-height: 1.5;
}

.rate-value, .pitch-value {
  float: right;
  width: 5%;
  line-height: 1.5;
}

#rate, #pitch {
  float: right;
  width: 81%;
}

.controls {
  text-align: center;
  margin-top: 10px;
}

.controls button {
  padding: 10px;
}
We're nearly done here!
Now We have the necessary files to run Web Speech API speech synthesis in our Laravel app. Let's try it out to see if it works.
Create a view to test Web Speech API speech synthesis. Go to /resources/views folder and create another folder web_speech_api_speech_synthesis. Inside web_speech_api_speech_synthesis folder, create a new blade index.blade.php. Copy and paste the following code to the newly created blade file.
<!DOCTYPE html>
<html>
  <head>
    <meta charset="utf-8">
    <meta http-equiv="X-UA-Compatible" content="IE=edge,chrome=1">
    <meta name="viewport" content="width=device-width">
    <title>Speech synthesiser</title>
    <link rel="stylesheet" href="{{ URL::asset('assets/css/web-speech-api-speech-synthesis.css') }}">
  </head>
  <body>
    <h1>Speech synthesiser</h1>
    <p>Enter some text in the input below and press return  or the "play" button to hear it. change voices using the dropdown menu.</p>
    <form>
      <input type="text" class="txt">
      <div>
        <label for="rate">Rate</label><input type="range" min="0.5" max="2" value="1" step="0.1" id="rate">
        <div class="rate-value">1</div>
        <div class="clearfix"></div>
      </div>
      <div>
        <label for="pitch">Pitch</label><input type="range" min="0" max="2" value="1" step="0.1" id="pitch">
        <div class="pitch-value">1</div>
        <div class="clearfix"></div>
      </div>
      <select>
        <option data-lang="en-US" data-name="Microsoft Zira Desktop - English (United States)">Microsoft Zira Desktop - English (United States) (en-US) -- DEFAULT</option>
      </select>
      <div class="controls">
        <button id="play" type="submit">Play</button>
      </div>
    </form>
    <script src="{{ URL::asset('assets/js/web-speech-api-speech-synthesis.js') }}"></script>
  </body>
</html>
Next, open /routes/web.php and add the following code.
Route::get('/web-speech-api-speech-synthesis', function () {
    return view('web_speech_api_speech_synthesis.index');
});
We're done!
Now open a browser and go to your project URL.
Append the path you've declared from routes. In our case it will be http://localhost/laravel/a_guinea_pig/web-speech-api-speech-synthesis.
You should see your Speech synthesizer page like below. If you're connected to the internet, script will check for additional languages from Google servers (basically you will have more voice options).
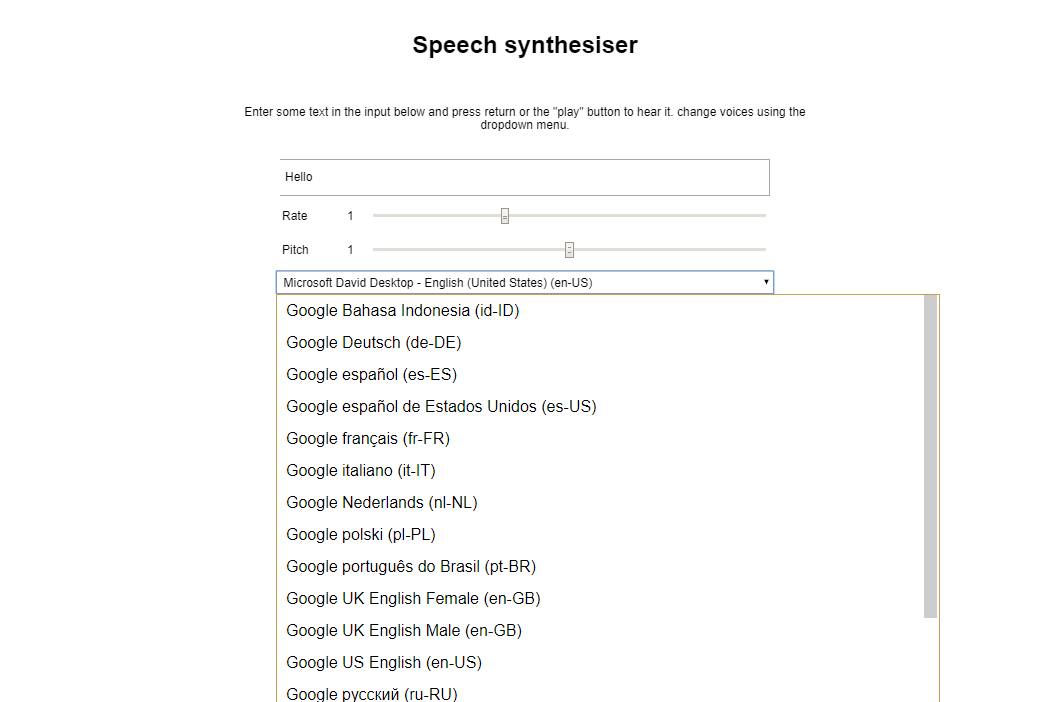
Let's check Web Speech API speech synthesis availability when your device's offline. Remove access to the internet, turn off your WiFi, and/or unplug the Ethernet cable from your computer. Now reload your page again. Speech synthesizer page will look like this when there's no internet available.

Notice that Microsoft David Desktop - English (United States) (en-US) and Microsoft Zira Desktop - English (United States) (en-US) are only left from voice select. Those are the default text-to-speech voices available in Windows. Now enter some text again in your input field and press the play button. Can still hear voice right? Great! Now we have proof that this plugin doesn't require internet connection to operate.
Common Issues When Using Web Speech API Speech Synthesis
Web Speech API speech synthesis not working in Chrome browser. Chrome throws an error: Uncaught (in promise) DOMException: play() failed because the user didn't interact with the document first. You may encounter this issue when you're trying to play audio automatically in Chrome. Major browsers like Chrome requires user interaction first before playing audio.
If you badly needed the audio auto-play functionality in Chrome, enable audio auto-play policy. Steps to enable audio auto-play policy may vary on Chrome version you're using.
What We Have Learned About Web Speech API Speech Synthesis
Adding text-to-speech functionality to a system connected to the internet is easy. You can easily integrate text-to-speech solutions such as ResponsiveVoice JS or Cloud text-to-speech in just a couple of minutes. The real challenge is having text-to-speech enabled for offline systems (not connected to the internet). Luckily we have Web Speech API speech synthesis. This JavaScript API library empowers offline systems by enabling speech synthesis without the need to request external resources. Unlike other TTS solutions, when you use Web Speech API speech synthesis, you don't have to signup on to any TTS service providers. You just have to include a JavaScript file on your project and voila! You can use it already.
When your system's online (connected to the internet) you'll have additional languages from Google servers. Otherwise, your system will use the default voices available on your computer operating system. Voices available in Windows are Microsoft Zira Desktop - English (United States) and Microsoft David Desktop - English (United States).
You can use Web Speech API speech synthesis regardless of the PHP framework you're using (not just Laravel). That's all we can share for now. Try using text-to-speech solutions we've shared with you today and see for yourself.
Leave a Reply
You have any questions or suggestions? Experiencing technical issues?
Please drop a comment, we're willing to resolve any issues and improve our solutions. Let's have a personal and meaningful conversation. 😀