

WordPress Scroll to Div on Mouse Scroll Using JavaScript
Last updated on February 19th, 2021
Need to create a fullscreen scrolling website in WordPress? Others also refer to it as one-page scroller website, parallax page, or landscape sliders. It's kinda popular to single-page websites/one-page sites.
How it works exactly? Simple, let's say you have one long page divided into sections. Your page will contain one section at a time like a presentation slideshow. On mouse scroll, the page will either scroll up (to previous section) or down (to next section) depends on the direction of your mouse scroll. "Section" we're referring here is simply a div tag in HTML. Simply put, We'll need our page to scroll to div on mouse scroll event like below.

In WordPress, there are lots of approaches to have this capability to scroll to different sections of a page with a mouse wheel event. 1. You may use WordPress plugins such as Page scroll to id, Full page scrolling with mousewheel, and Mousewheel smooth scroll. 2. You may write your custom script (JavaScript). 3. Lastly, you may use a jQuery library to have this full section scrolling feature on your WordPress website. Here, in this tutorial, We'll be focused on implementing the described feature through writing our custom script (JavaScript) and using a jQuery library -- Alvaro Trigo’s pagePiling.js.
Bonus guide. We'll share with you a simple fix for Chrome error [Intervention] Unable to preventDefault inside passive event listener due to target being treated as passive. These errors are common to sites having a full section scrolling feature already implemented.
Summary
Scroll to Div on Mouse Scroll Using JavaScript
Fix Unable to PreventDefault Inside Passive Event Listener
Scroll to Div on Mouse Scroll with Alvaro Trigo's PagePiling.js
Requirements & Remarks
- Your WordPress website up and running
- Access and permission to update your WordPress files
We'll use WordPress default theme Twenty Twenty to demo scrolling div on mouse scroll event.
To create a solution that'll work, We referred to StackOverflow's auto-scroll to next anchor at mouse-wheel topic here. The solution works for most browsers. It also works in Chrome, ... but there's an issue regarding scroll we have to amend. Chrome returns an error [Intervention] Unable to preventDefault inside passive event listener due to target being treated as passive. The error results in choppy scroll in Chrome. Later We'll share with you a simple solution to fix the error.
Let's get started!
Solution 1: We'll write a custom script (JavaScript) to have this capability to scroll to div on mouse scroll in WordPress. It'll contain codes to trigger scroll to next div on mouse wheel event. This solution requires jQuery (jquery-3.1.0.js).
Scroll to Div on Mouse Scroll Using JavaScript
Step 1: Backup Your WordPress Files and Database
Backup your WordPress site first before touching it. Now it's easier to backup WordPress websites using plugins such as Duplicator, All-in-one WP migration, UpdraftPlus, etc. In case you're restricted to use a plugin, you can always manually backup your WordPress files and database.
Step 2: Create and Activate Your Child Theme
As we've stated above, We have to create and include a custom script + jquery-3.1.0.js to add scroll to div on mouse scroll functionality. We'll enqueue those scripts so they will be loaded on our page.
To enqueue JavaScript in WordPress, We have to: 1. Create a custom function in theme's functions.php (inside this function, we'll enqueue our scripts), 2. Hook the newly created function to wp_enqueue_scripts. To do those, we have to update our theme's functions.php. In WordPress, when you directly modify a theme file and you update your parent theme, changes you've made will be overwritten. To avoid that to happen, we'll use a child theme. Child theme will let us update our parent theme without affecting the customizations we've made to our site.
Inside your project folder, navigate to /wp-content/themes/, create a folder yourtheme-child (we're using Twenty Twenty theme so it'll be twentytwenty-child).

Create style.css inside yourtheme-child folder and paste the following code:
/*
Theme Name:   Twenty Twenty Child
Theme URI:    http://example.com/twenty-twenty-child/
Description:  Twenty Twenty Child Theme
Author:       John Doe
Author URI:   http://example.com
Template:     twentytwenty
Version:      1.0.0
License:      GNU General Public License v2 or later
License URI:  http://www.gnu.org/licenses/gpl-2.0.html
Tags:         light, dark, two-columns, right-sidebar, responsive-layout, accessibility-ready
Text Domain:  twentytwentychild
*/
Change values accordingly.
Create functions.php inside your yourtheme-child and paste the following code:
add_action('wp_enqueue_scripts', 'my_theme_enqueue_styles');
function my_theme_enqueue_styles() {

  $parent_style = 'parent-style'; // This is 'twentytwenty-style' for the Twenty Twenty theme.

  wp_enqueue_style( $parent_style, get_template_directory_uri() . '/style.css' );
  wp_enqueue_style( 'twentytwenty-style',
      get_stylesheet_directory_uri() . '/style.css',
      array( $parent_style ),
      wp_get_theme()->get('Version')
  );
}
Adjust values accordingly.
Now you have to activate your newly created child theme.
Go to Themes. From left sidebar, hover your mouse cursor to Appearance and select themes. You should see the newly added child theme. Click Activate button to activate your child theme.
Step 3: Scroll to Div on Mouse Scroll Using JavaScript
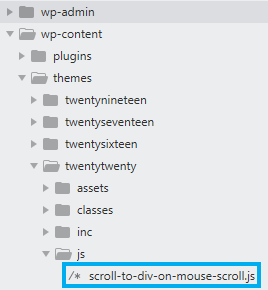
From your project folder, navigate to /wp-content/themes/yourtheme folder (we're using Twenty Twenty theme so we should be inside /wp-content/themes/twentytwenty folder). Create a folder named js. Inside js folder, create a JavaScript file named scroll-to-div-on-mouse-scroll.js. This script will contain short and simple code for scroll to div on mouse scroll functionality.
Open scroll-to-div-on-mouse-scroll.js and paste the following code:
console.log("You should see me at console..."); // #1

(function() { // #2
  var delay = false;

  $(document).on('mousewheel DOMMouseScroll', function(event) { // #3
    event.preventDefault();
    if(delay) return;

    delay = true; // #4
    setTimeout(function(){delay = false},200)

    var wheelDirection = event.originalEvent.wheelDelta || -event.originalEvent.detail; // #5

    var anchorDivs = document.getElementsByClassName('anchor-div'); // #6

    if(wheelDirection < 0) { // #7
    	console.log('scrolled down');
      for(var i = 0 ; i < anchorDivs.length ; i++) {
        var t = anchorDivs[i].getClientRects()[0].top; // #8
        if(t >= 40) break;
      }
    } else { // #9
    	console.log('scrolled up');
      for(var i = anchorDivs.length-1 ; i >= 0 ; i--) {
        var t = anchorDivs[i].getClientRects()[0].top; // #10
        if(t < -20) break;
      }
    }
    if(i >= 0 && i < anchorDivs.length) {
      $('html,body').animate({
        scrollTop: anchorDivs[i].offsetTop
      });
    }
  });
})();
Source code explanation
1. Check if our script could be loaded on our page.
2. A self-invoking function (this function will be started automatically without being called), we put our code inside it.
3. Listen to mouse wheel event. Event listener mousewheel won't work in Firefox so we have to use DOMMouseScroll also.
4. Variable delay prevents mouse wheel from scrolling too quickly.
5. Get mouse wheel event details so we can identify later the direction of the scroll. event.originalEvent.wheelDelta won't work in Firefox so we have to use -event.originalEvent.detail also.
6. Get all elements that have class "anchor-div". Later we add class "anchor-div" to our chosen divs.
7. If wheelDirection value is less than 0 (means page's scrolling down) then,
8. We loop through each element (w/ class "anchor-div") beginning with the first, until its first getClientRects() top is greater or equal to 40. 40 is the value we use (in case the browser has margin at the top of the viewport). In simple terms, we scroll the page to the next section.
9. If wheelDirection value isn't a negative number (means page's scrolling up) then,
10. Loop through each element (w/ class "anchor-div") beginning with the last, until its first getClientRects() top is less than -20. -20 is the value we use (to make sure we're moving up the page). We scroll the page to previous section.
Now, We've got our script and We're now capable to scroll to div on mouse scroll event.
Next, We have to setup jQuery (jquery-3.1.0.js) to be able to use animate() method. Get jquery-3.1.0.js here and place it inside your js folder (where scroll-to-div-on-mouse-scroll.js also located).

Now, We've got all the required scripts, we just have to load them on our page. The right way to load scripts in WordPress is to enqueue them. To enqueue scroll-to-div-on-mouse-scroll.js and jquery-3.1.0.js, we have to add a custom function in our themes functions.php.
Open your child's theme's functions.php and add the following code.
add_action('wp_enqueue_scripts', 'custom_js'); #1
function custom_js() { #2
  wp_enqueue_script( #3
  	'scroll_to_div_on_mouse_scroll', #4
  	get_template_directory_uri() . '/js/scroll-to-div-on-mouse-scroll.js', #5
  	array ( 'jquery' ), #6
  	1.0, #7
  	true #8
  );

  // Register other js here...
 	wp_register_script('jquery-3.1.0', get_template_directory_uri().'/js/jquery-3.1.0.js'); #9

	// Enqueue (call) all scripts here...
  wp_enqueue_script('jquery-3.1.0'); #10
}
Source code explanation
1. Hook function custom_js (we'll create this function in next line) to function wp_enqueue_scripts.
2. Create a custom function named custom_js. Inside this function, we'll enqueue our custom script (scroll-to-div-on-mouse-scroll.js) and jquery-3.1.0.js.
3. Enqueue our custom script.
4. Name of our custom script (must be unique).
5. Path to our custom script (remember that we've created scroll-to-div-on-mouse-scroll.js inside /wp-content/themes/twentytwenty/js folder). We call function get_template_directory_uri to return theme's root directory, then we append "/js/scroll-to-div-on-mouse-scroll.js".
6. Array of registered script/s handles our custom script depends on.
7. Version of our custom script (we just have created scroll-to-div-on-mouse-scroll.js, so we put 1.0).
8. Option to enqueue scripts before body tag instead of in the head. We want HTML to load first before we run our custom script. So, we'll set the value to "true" (enqueue scripts before body tag).
9. We can register other scripts here (here we register jquery-3.1.0).
10. We enqueue (call) all other scripts.
Verify if scripts could be loaded on your page. Open your browser, go to your website and reload the page. Inspect element, right-click and select Inspect or press Ctrl + Shift + I (in Chrome). Navigate to Elements tab, search for scroll-to-div-on-mouse-scroll.js and jquery-3.1.0.js.
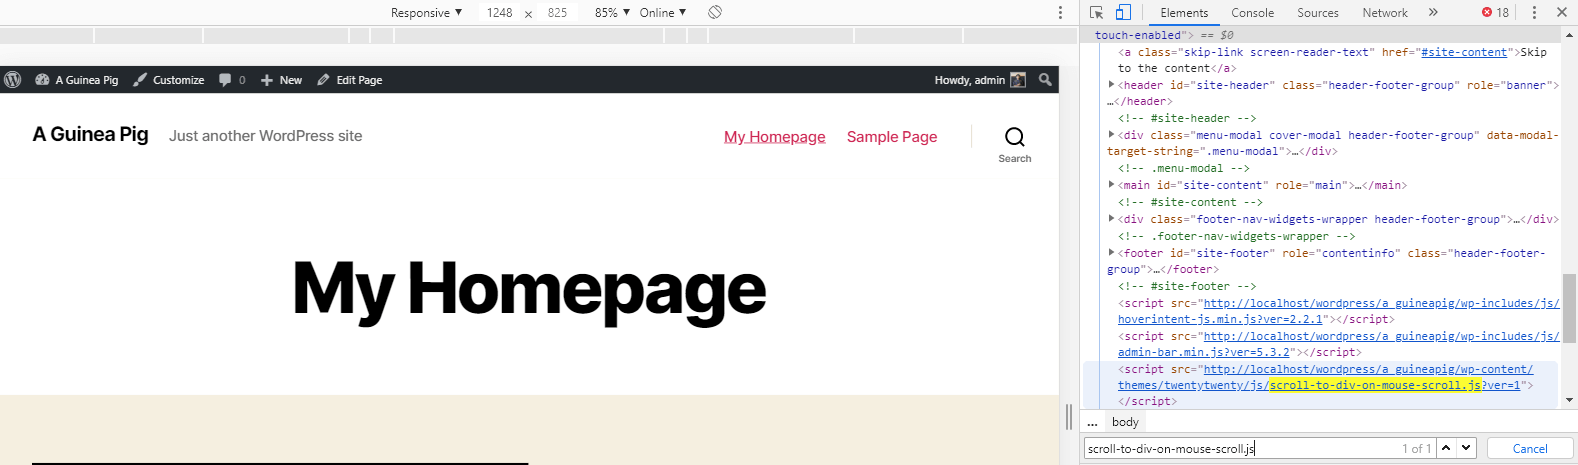

You should verify if scripts could be loaded on your page.
We're nearly done here!
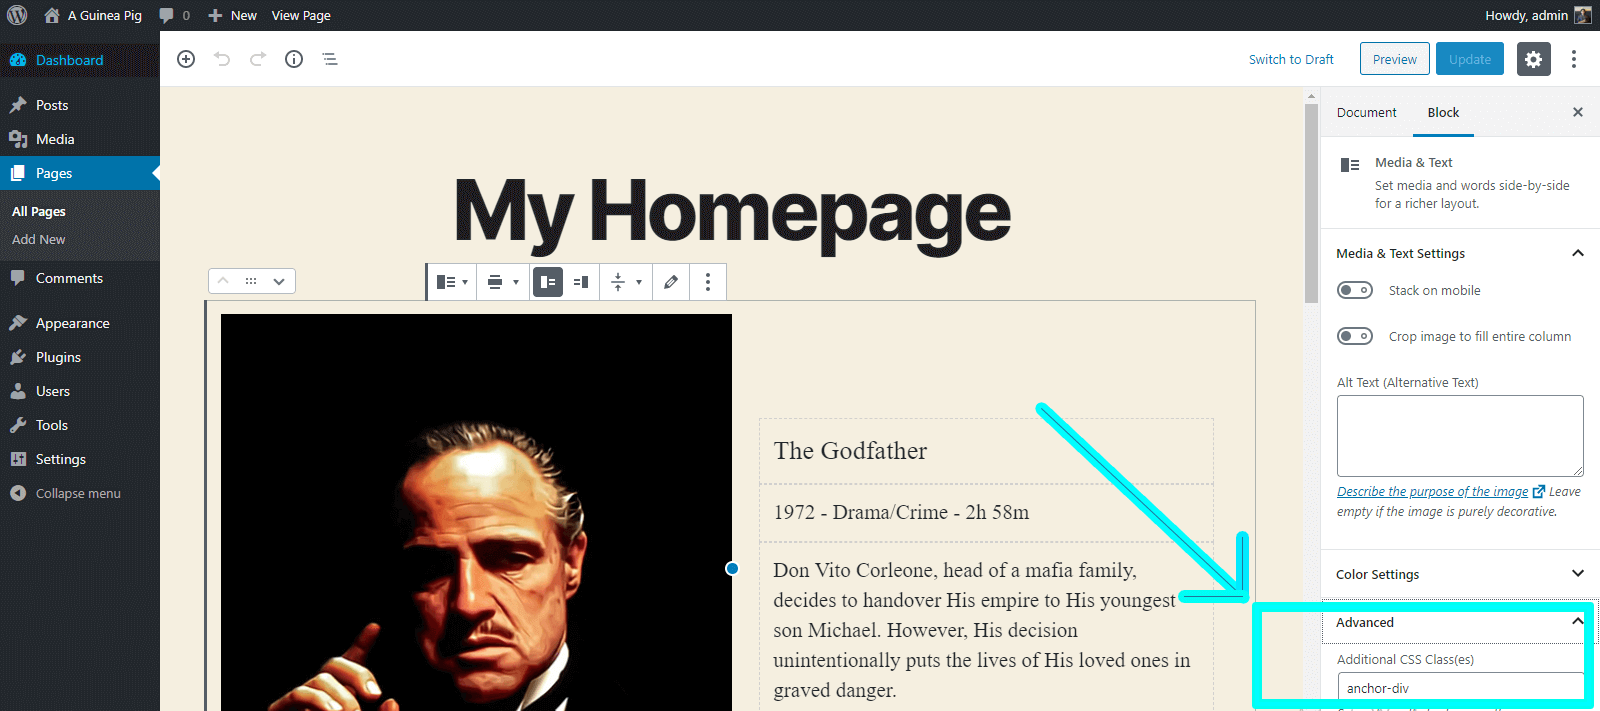
Edit your page or post and choose sections you want to scroll to. Add class anchor-div. Here's how We've added a class to sections We want to scroll to.
Done!
Now go back to your website, reload your page and try to scroll.
Auto-scroll to div on mouse scroll event should be working now.
With basic familiarity with WordPress and JavaScript, the source code above could be implemented easily on your website.
Fix Unable to PreventDefault Inside Passive Event Listener in Chrome
OK, you've got scroll to div on mouse scroll event working, good for you. Yet, there's something else within the script we have to amend. We've stated it above earlier.
If you're using Chrome, take another look while you scroll the page. Look carefully, ... notice the choppy scroll?
Go back to your browser and Inspect element again, navigate to console tab, you'll see this error [Intervention] Unable to preventDefault inside passive event listener due to target being treated as passive.
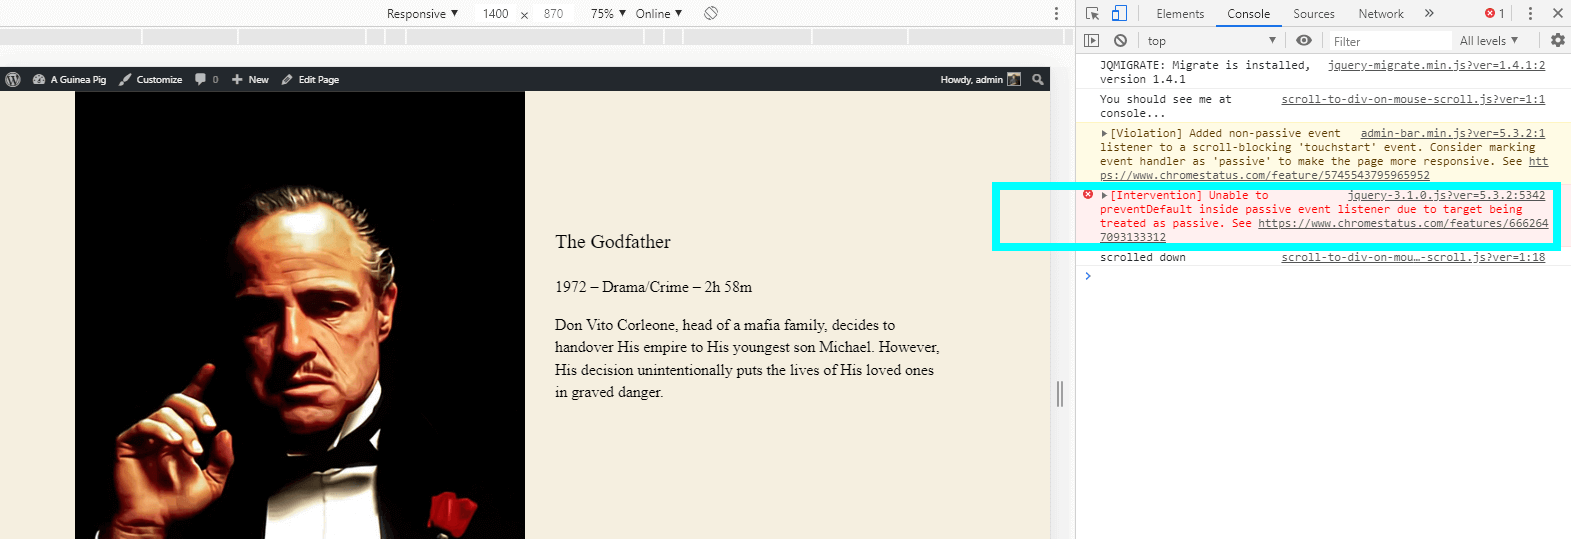
Error above makes scrolling in Chrome a bit laggy. To make scroll to div on mouse scroll smoother, we have to fix the error. We'll update our script (scroll-to-div-on-mouse-scroll.js) a little bit.
Open scroll-to-div-on-mouse-scroll.js again and replace everything with the following code.
console.log("You should see me at console...");

(function() {
	var delay = false;
	var wideScreen = window.matchMedia("(min-width: 768px)"); // #1

 	// $(document).on('mousewheel DOMMouseScroll', function(event) { // #2

 	document.addEventListener('wheel', function(event){

 		// is screen size not less than 768px? // If media query matches
		if (wideScreen.matches) { // #3
			event.preventDefault();
	    if(delay) return;

	    delay = true;
	    setTimeout(function(){delay = false},200)

	    // var wd = event.originalEvent.wheelDelta || -event.originalEvent.detail;

	    var anchorDivs = document.getElementsByClassName("anchor-div");

	    // scrolled down?
	   	if (event.deltaY > 0){ // #4
	      console.log('scrolled down');
	      for(var i = 0 ; i < anchorDivs.length ; i++) {
	        var t = anchorDivs[i].getClientRects()[0].top;
	        if(t >= 40) break;
	      }
	   	} else if (event.deltaY < 0) { // #5
	      console.log('scrolled up');
	      for(var i = anchorDivs.length-1 ; i >= 0 ; i--) {
	        var t = anchorDivs[i].getClientRects()[0].top;
	        if(t < -20) break;
	      }
	   	}

	    if(i >= 0 && i < anchorDivs.length) {
	      $('html,body').animate({
	        scrollTop: anchorDivs[i].offsetTop
	      });
	    }
		}
	//Add param '{passive: false}' to fix 'Unable to preventDefault inside passive event listener due to target being treated as passive.'
	}, {passive: false});
  // });
})(jQuery);
Source code explanation
We'll explain only the changes we've made to fix Chrome error (regarding scroll) — setting the passive option default to "true" on touch or wheel event.
1. Only enable scroll to div on mouse scroll for screen size not less than 768px.
2. As per Chrome v73 update -- Treat Document Level Wheel/Mousewheel Event Listeners as Passive. They've stated the following.
The wheel/mousewheel event listeners that are registered on document level targets (window.document, window.document.body, or window) will be treated as passive if not specified as otherwise and calling preventDefault() inside such listeners will be ignored.
Chrome v73 updates (regarding scroll) creates issue on jQuery scroll libraries such as jquery.nicescroll, smooth-scroll.js, etc. As a simple fix, We'll add parameter passive and specify the value as "false" to wheel/mousewheel event listeners.
Replace $(document).on('mousewheel DOMMouseScroll', function(event) {}); with document.addEventListener('wheel', function(event){ }, {passive: false});.
3. If the device screen size not less than 768px, continue.
4. If event.deltaY value is greater than 0 (means page's scrolling down) then scroll down to the next anchor.
5. Else if event.deltaY value is less than 0 (means page's scrolling up) then scroll up to previous anchor.
Updated script above should fixed the error [Intervention] Unable to preventDefault inside passive event listener due to target being treated as passive in Chrome.
Scroll to div on mouse scroll event should be smoother now in Chrome.
Scroll to Div on Mouse Scroll with Alvaro Trigo's PagePiling.js
You've got scroll to div on mouse scroll event working using a custom JavaScript, good for you.
If you want to configure your fullscreen scrolling site (e.g. scroll direction, scroll speed, transition effects) then continue to read. Here, we'll share with you another solution to create a scrolling site using pagePiling.js plugin by Alvaro Trigo. With pagePiling.js you can pile your sections one over another by scrolling or by URL. We've tried Alvaro Trigo's solution to create a parallax like page and here's what it looks like.

Steps to Integrate Alvaro Trigo's PagePiling.js in WordPress
The ideal way to add Alvaro Trigo's pagePiling.js in your WordPress project is to: 1. Download and store required scripts and stylesheet locally, then 2. Enqueue them all from functions.php. You can download required script (jquery.pagepiling.css) and stylesheet (jquery.pagepiling.js) here.
Since we already have a solution for scroll to div on mouse scroll event and we just want to try pagePiling.js; We'll just use CDN instead of downloading and enqueueing required files.
We'll include scripts and stylesheet in our theme's footer.php.
First, We'll replicate footer.php from the parent theme folder to child theme folder (so when we update our parent theme, footer.php won't be overwritten). We'll open child theme's footer.php and paste the following code before body tag.
<script src="https://cdnjs.cloudflare.com/ajax/libs/pagePiling.js/1.5.6/jquery.pagepiling.css"></script> #1
<script src="http://ajax.googleapis.com/ajax/libs/jquery/1.11.1/jquery.min.js"></script> #2
<script src="https://cdnjs.cloudflare.com/ajax/libs/pagePiling.js/1.5.6/jquery.pagepiling.js"></script> #3
<script type="text/javascript">
	$(document).ready(function() {
		$('#pagepiling').pagepiling(); #4
	});
</script>
Source code explanation
1. Link to jquery.pagepiling.css.
2. Link to jquery.min.js.
3. Link to jquery.pagepiling.js.
4. Call the plugin inside a $(document).ready function.
Now that we've added Alvaro Trigo's pagePiling.js in our WordPress site, We just have to use it.
We'll create a page and paste the following HTML (We're using Gutenberg visual editor that supports adding custom HTML code).
<div id="pagepiling">
  <div class="section" style="background-color: blue;">Some section</div>
  <div class="section" style="background-color: red;">Some section</div>
  <div class="section" style="background-color: green;">Some section</div>
  <div class="section" style="background-color: yellow;">Some section</div>
</div>
Above code should be the structure of your HTML.
For more options such as scroll direction, scroll speed, transition effects etc., you may pass parameter from pagepiling() function. Refer here to alvaro trigo's pagePiling.js in Github.
Final Thoughts
Full-screen scrolling sites are popular nowadays for single page websites. No doubt that parallax scrolling effects are great for presentations.
In WordPress, you can have this capability to scroll to div on mouse scroll by: 1. Using a WordPress plugin. 2. Writing your custom script (JavaScript) or 3. Using jQuery library.
Due to Chrome v73 update (regarding scroll) — setting the passive option default to "true" on touch or wheel event. Error [Intervention] Unable to preventDefault inside passive event listener due to target being treated as passive becomes common to sites having full section scrolling feature already implemented. As a simple fix, We just have to set the passive option value to "false".
That's all we can share for now. Happy coding fellas!
Leave a Reply
You have any questions or suggestions? Experiencing technical issues?
Please drop a comment, we're willing to resolve any issues and improve our solutions. Let's have a personal and meaningful conversation. 😀